Quick Installation Guide TEW-653AP 1.
Table of Contents English 1. Before You Start 2. Hardware Installation 3. Power-over-Ethnernet Installation 4. Configure the Access Point 5. Mounting 1 1 2 3 5 8 Troubleshooting 9 Version 11.16.
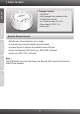
1. Before You Start ENGLISH Package Contents ? TEW-653AP ? Multi-Language Quick Installation Guide ? CD-ROM (User’s Guide) ? Cat. 5 Ethernet Cable (1m / 3.3ft.) ? Power Adapter (12V DC, 1A) FRANÇAIS ? Mounting Kit System Requirements DEUTSCH ? Web Browser: Internet Explorer (6.0 or higher) ? A computer with a network adapter properly installed. ? A network Switch or Hub with an available network LAN port. ? Power over Ethernet (PoE) Switch (e.g.
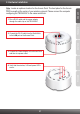
Note: Locate an optimum location for the Access Point. The best place for the Access Point is usually at the center of your wireless network. Please connect the computer configuring the TEW-653AP to the same switch/hub. ENGLISH 2. Hardware Installation DEUTSCH 2. Connect the RJ-45 cable from the Switch/Hub to the LAN port on the Access Point. FRANÇAIS 1. Run a RJ-45 cable and the power adapter through the cable clip on the TEW-653AP. ÐÓÑÑÊÈÉ 4. Verify that the wireless, LAN and power LEDs are on.
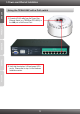
3. Power-over-Ethernet Installation 1. Connect a RJ-45 cable from the Power-OverEthernet Switch (e.g. TRENDnet TPE-80WS) to the LAN port on the Access Point. 2. Verify that the wireless, LAN and power LEDs are on. Please refer to step 4 in the Hardware Installation section.
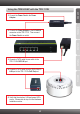
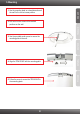
1. Connect the Power Cord to the Power Adapter. DEUTSCH 2. Connect the Power Adapter to the DC 48V IN connector on the TPE-111GI. Then connect the Power Cord to an outlet. FRANÇAIS ENGLISH Using the TEW-653AP with the TPE-111GI ESPAÑOL 3. Connect a CAT-5 cable from a switch to the TPE-111GI's DATA IN port. ÐÓÑÑÊÈÉ 4. Connect a CAT-5 cable from the TEW-653AP's LAN port to the TPE-111GI's PoE Out port. 5. Verify that the wireless, LAN and power LEDs are on.
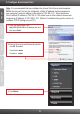
Note: It is recommended that you configure the Access Point from a wired computer. Before the Access Point can be configured, a Static IP address must be assigned to your computer's network adapter in the subnet of 192.168.10.X. Since the Access Point's default IP address is 192.168.10.100, make sure no other network devices are assigned an IP address of 192.168.10.100. (Refer to Troubleshooting section on how to configure TCP/IP settings on your PC.) 1. Open your web browser, type http://192.168.10.
ENGLISH 4. Click Next. 6. Use your mouse to select the desired security level (lowest for no encryption, highest for WPA2-PSK). DEUTSCH ESPAÑOL Note: 1. To protect your network from any unauthorized access it is recommended to enable wireless encryption. 2. The examples below are for WPA2-PSK security. If you select WPA-PSK or WPA2-PSK, make sure your wireless adapters support WPA or WPA2. If your wireless adapters do not support WPA or WPA2, then select WEP. FRANÇAIS 5.
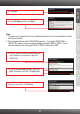
ENGLISH 9. Wait 24 seconds while the Access Point reboots. ESPAÑOL DEUTSCH FRANÇAIS 10. Click System -> LAN. Configure the LAN settings to match your network settings and then click Apply. 11. Wait 14 seconds while the Access Point reboots. Your configuration is complete For detailed information regarding the TEW-653AP’s configuration and advanced settings, please refer to the Troubleshooting section, User's Guide CD-ROM, or TRENDnet's website at http://www.trendnet.com.
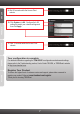
1. Use the mounting plate as a template and mark the wall for the correct screw position. ENGLISH 5. Mounting FRANÇAIS 2. Drill holes for the screws at the marked positions on the wall. 5. Follow the arrow to secure the TEW-653AP to the mounting plate. 8 ÐÓÑÑÊÈÉ 4. Align the TEW-653AP with the mounting plate ESPAÑOL DEUTSCH 3. Use the provided wood screws to secure the mounting plate to the wall.
Troubleshooting How do I configure TCP/IP settings on my computer? Windows Vista 1. Go into the Control Panel, click Network and Internet, click Network and Sharing Center, click Manage Network Connections and then right-click the Local Area Connection icon and then click Properties. 2. Click Internet Protocol Version 4(TCP/IPv4) and then click Properties. Then click on Use the following IP address, and make sure you assign your network adapter an IP address in the subnet of 192.168.10.x.
If my network's IP is different than the Access Point's range, what should I do? You should still configure the Access Point first. After all the settings are applied, go to the Access Point's configuration page, click on System, click on LAN and change the IP address of the Access Point to match your network's IP. After I successfully configured the Access Point to match my network settings, I can not connect to my network using wireless computers.
Wireless Tips The following are some general wireless tips to help minimize the impact of interference within an environment. Assign your network a unique SSID Do not use anything that would be identifying like “Smith Family Network”. Choose something that you would easily identify when searching for available wireless networks. Do not turn off the SSID broadcast The SSID broadcast is intended to be on and turning it off can cause connectivity issues.
2. Keep the number of obstructions to a minimum. Each obstruction can reduce the range of a wireless device. Position the wireless devices in a manner that will minimize the amount of obstructions between them. 3. Building materials can have a large impact on your wireless signal. In an indoor environment, try to position the wireless devices so that the signal passes through less dense material such as dry wall.
GPL/LGPL General Information This TRENDnet product includes free software written by third party developers. These codes are subject to the GNU General Public License ("GPL") or GNU Lesser General Public License ("LGPL"). These codes are distributed WITHOUT WARRANTY and are subject to the copyrights of the developers. TRENDnet does not provide technical support for these codes. The details of the GNU GPL and LGPL are included in the product CD-ROM. Please also go to (http://www.gnu.org/licenses/gpl.
GPL/LGPL informações Gerais Este produto TRENDnet inclui software gratuito desenvolvido por terceiros. Estes códigos estão sujeitos ao GPL (GNU General Public License) ou ao LGPL (GNU Lesser General Public License). Estes códigos são distribuídos SEM GARANTIA e estão sujeitos aos direitos autorais dos desenvolvedores. TRENDnet não presta suporte técnico a estes códigos. Os detalhes do GNU GPL e do LGPL estão no CD-ROM do produto. Favor acessar http://www.gnu.org/licenses/gpl.txt ou http://www.gnu.
Product Warranty Registration Please take a moment to register your product online. Go to TRENDnet’s website at http://www.trendnet.com/register Copyright ©2009. All Rights Reserved. TRENDnet.