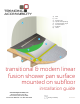
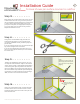
a) b) c) d) e) f) g) h) a Wall Tile Shower Pan Liquid waterproofing Crack Isolation Tape Cement Board Subfloor Joists b c d f g h e transitional & modern linear fusion shower pan surface mounted on subfloor installation guide www.TrendingAccessibility.
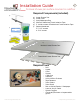
Installation Guide 2 for linear shower pan surface mounted on subfloor Required Components (included) b) c) f) a) b) c) d) e) f) Linear Shower Pan Linear Drain Liquid Waterproofing One Roll Rubberized Crack Isolation Tape 2 - Inside corners of Rubberized Crack Isolation Tape Gasket Membrane 15 - 2 1/2” screws 4 - 3/4” screws d) e) a) a) • • Modern Linear Shower Pan Transitional Linear Shower Pan Required Tools • • • • • • • • • • • • • • www.trendingaccessibility.
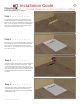
Installation Guide 3 for linear shower pan surface mounted on subfloor Step 1 > > > > > > > > > For optimal performance, it is imperative there is a level surface prior to installation of new Linear Shower Pan. Check existing floor to make sure it is level. If it is not, please correct prior to installation. Place the Linear Shower pan in desired location and check to make sure it is level.
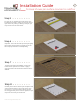
Installation Guide 4 for linear shower pan surface mounted on subfloor Step 5 > > > > > > > > > For your dry run, position the Linear shower pan into place and check to make sure the pan is level. If you notice any rocking or flexing in the pan, you may need to shim or shave areas. Step 6 > > > > > > > > > Important: You must sand the top of the pan lightly with a palm or belt sander to roughen up the surface for proper adhesion of waterproofing.
Installation Guide 5 for linear shower pan surface mounted on subfloor Step 9 > > > > > > > > > On top of existing subfloor and walls install cement backerboard in preparation for tiling. Make sure that the top of the backerboard is roughly 1/8” higher than the Fusion pan. Start with a bed of thinset using a 1/4” notched trowel. Next, attach the first layer of 1/2” backerboard with 1 1/4” cement board screws 8” on center.
Installation Guide 6 for linear shower pan surface mounted on subfloor Step 13 > > > > > > > > Begin taping the wetroom floor at the interior corners of the Linear Fusion Pan using the corner pieces of the crack isolation tape provided. Using a paint brush or trowel, slather liquid waterproofing into corner, press piece into place, then apply liquid waterproofing on top. Make sure to smooth out any creases. Repeat for additional corners.
Installation Guide 7 for linear shower pan surface mounted on subfloor Step 17 > > > > > > > > Using the provided precut piece of gasket membrane, slather area where gasket piece will adhered to the drain area. Place over drain adapter flange, making sure to cover all screw holes, and securely press down into flange. Coat top of gasket piece with liquid waterproofing. Gasket Membrane Step 18 > > > > > > > > Begin the application of the liquid waterproofing membrane.
Installation Guide 8 for linear shower pan surface mounted on subfloor Step 20 > > > > > > > > You are now ready to tile. If you are using large format tiles, they must be cut diagonally and laid to follow the pitch in the Linear Fusion Pan (From the corners of the grate frame to the corners of the Fusion Pan). Apply the tile adhesive, and lay the tiles in a regular pattern. www.trendingaccessibility.com info@trendingaccessibility.