
Manual

Installation Guide
www.trendingaccessibility.com info@trendingaccessibility.com
7
for linear shower pan surface mounted on concrete
Step 18 > > > > > > > >
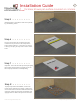
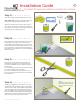
Using the provided precut piece of gasket mem-
brane, slather area where gasket piece will ad-
hered to the drain area. Place over drain adapter
flange, making sure to cover all screw holes, and
securely press down into flange. Coat top of gas-
ket piece with liquid waterproofing.
Gasket
Membrane
Step 19 > > > > > > > >
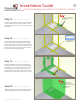
Begin the application of the liquid waterproofing
membrane. Paint a layer of liquid waterproofing over
all taped joints. It is easiest to begin with the walls
first and then proceed to the floor area. For con-
sistant application, use a paint roller to apply water-
proofing to all surfaces. After first coat is dry, re-coat.
Step 20 > > > > > > >
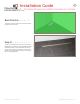
Apply two coats of liquid waterproofing to achieve
2 mils. (roughly the thickness of a credit card)
BEST PRACTICE:
To achieve the best
results, we recommend
waterproofing the
whole room.
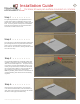
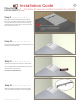
Step 17 > > > > > > > >
Using the 5” crack isolation tape. Overlap all seams
of cement board used on either the floors or walls.
Overlap the seam where the Fusion pan and cement
board meet.
Make sure the tape
overlaps the seams
equally.