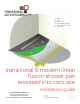
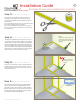
a) b) c) d) e) f) a Wall Tile Shower Pan Liquid waterproofing Crack Isolation Tape Concrete b c d f e transitional & modern linear fusion shower pan recessed into concrete installation guide www.TrendingAccessibility.
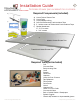
Installation Guide 2 for linear shower pan recessed into concrete Required Components (included) b) a) b) c) d) e) f) c) f) e) d) Linear Fusion Shower Pan Linear Drain Liquid Waterproofing One Roll Rubberized Crack Isolation Tape 2 - Inside corners of Rubberized Crack Isolation Tape Gasket Membrane 15 - 2 1/2” screws 4 - 3/4” screws a) • • Modern Linear Shower Pan Transitional Linear Shower Pan Required Tools (not included) • • • • • • • • • • • • • • • • • • www.trendingaccessibility.
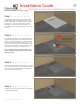
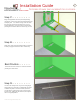
Installation Guide 3 for linear shower pan recessed into concrete Step 1 > > > > > > > > > For optimal performance, it is imperative there is a level surface prior to installation of new Linear Fusion Shower Pan. Check existing floor to make sure it is level. If it is not, please correct prior to installation. Place the Linear Shower Pan in desired location and mark the edge of the pan on the concrete.
Installation Guide 4 for linear shower pan recessed into concrete Step 5 > > > > > > > > > Set the Linear Fusion Shower Pan into place and check to make sure it is level. If for some reason you notice any rocking or flexing in the pan, you may need to build up or shave areas. This is important to achieve proper drainage.
Installation Guide 5 for linear shower pan recessed into concrete Step 9 > > > > > > > > > If the Fusion Pan is above the level of the floor, use a screed bed to raise the floor. Check that the Linear Fusion Pan is level on all four sides. Fill in any gaps around the perimeter of the pan over 1/8” with latex or acrylic caulk. Do not use 100% silicone. Step 10 > > > > > > > > Make your final connections to the drain. Make sure connection is snug but do not over tighten.
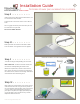
Installation Guide 6 for linear shower pan recessed into concrete Step 13 > > > > > > > > Using the 5” crack isolation tape provided, cut strips of tape to length, to cover all seams (Corner seams, wall/floor seams, pan/floor joint). Put pieces aside. If you are creating full wet room, you will need to tape any seams throughout the entire room. If you are only waterproofing the shower zone, you will only need to tape the seams up to 2 feet outside the shower area.
Installation Guide 7 for linear shower pan recessed into concrete Step 17 > > > > > > > > Begin the application of the liquid waterproofing membrane. Paint a layer of liquid waterproofing over all taped joints. It is easiest to begin with the walls first and then proceed to the floor area. For consistant application, use a paint roller to apply waterproofing to all surfaces. After first coat is dry, re-coat.