
User guide
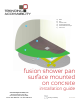

Installation Guide
www.trendingaccessibility.com info@trendingaccessibility.com
6
for fusion shower pan surface mounted on conrete
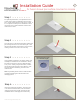
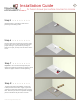
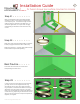
Step 9 > > > > > > > >
Again while insuring that your pan has remained
level, drill and counter sink holes into the Fusion
pan. Using cement anchors, attach the pan. Do
not aggressively screw and over tighten, as you
may force the Fusion Pan out of level.
If required you may drill and
countersink anywhere on the
surface of the Fusion Pan.
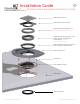
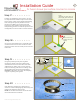
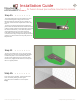
Step 12 > > > > > > > >
You now want to attach the Drain adapter flange
to the Fusion Pan. First apply a bead of caulk to
the underside of the drain adapter flange. Lightly
push the flange into place, and screw it down
using the four ¾” screws provided. Remove any
excess caulk that squeezes out.
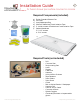
membrane clamp
height adjustment ring
Remove the tile height adjustment ring and membrane clamp and
place to one side; these will be required later in the installation.
Gasket Clamp
Adapter Drain Flange
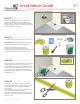
Step 11 > > > > > > > >
Check that the Fusion Pan is level on all four sides.
Fill in any gaps around the perimeter of the pan over
1/8” with latex or acrylic caulk.
Do not use 100% silicone.
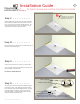
Step 10 > > > > > > > >
Using a screed bed, bring the rest of the floor up to
the level of the Fusion pan.