
Owner manual


Installation Guide
www.trendingaccessibility.com info@trendingaccessibility.com
7
for adjustable fusion shower pan surface mounted on suboors
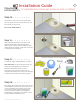
Step 14 > > > > > > > >
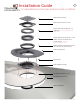
Make your final connections to the drain. First
apply a bead of caulk to the underside of the
strainer body. Pass the strainer through the drain
adapter flange, and tighten. Make sure connection
is snug but do not over tighten.
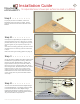
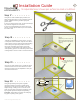
Step 16> > > > > > > >
Begin taping the wetroom floor at the interior corners
of the Adjustable Fusion Pan using the corner pieces
of the crack isolation tape provided. Using a paint
brush or trowel, slather liquid waterproofing into
corner, press piece into place, then apply liquid
waterproofing on top. Make sure to smooth out any
creases. Repeat for additional corners.
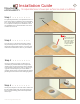
Step 15 > > > > > > > >
You will now begin waterproofing the wet room.
BEST PRACTICE: To achieve the best results, we
recommend waterproofing the whole room.
Minimum requirements, shown in these
instructions, show you that you only have to
waterproof the shower zone, which is 6 ½ feet high
and about 2 feet outside of the showering area.
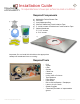
Materials needed for wet room waterproofing.
Step 13 > > > > > > > >
Check that the Fusion Pan is level on all four sides.
Fill in any gaps around the perimeter of the pan over
1/8” with latex or acrylic caulk.
Do not use 100% silicone.