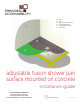
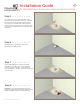
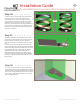
a) b) c) d) e) f) a Wall Tile Adjustable Shower Pan Liquid Membrane Crack Isolation Tape Concrete b d c f e adjustable fusion shower pan surface mounted on concrete installation guide www.TrendingAccessibility.
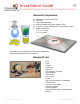
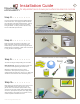
Installation Guide 2 for adjustable fusion shower pan surface mounted on concrete Required Components b) c) f) e) d) a) b) c) d) e) f) Adjustable Fusion Shower Pan Tile Drain Liquid Waterproofing One Roll Rubberized Crack Isolation Tape 2 - Inside corners of Rubberized Crack Isolation Tape Gasket Membrane 15 - 2 1/2” screws 4 - 3/4” screws a) nt stme Adju 0° 36 Important: Do not install this kit without the appropriate waterproof‐membrane liners or coating.
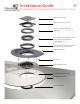
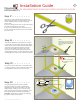
Installation Guide 3 for adjustable fusion shower pan surface mounted on concrete Stainless Steel Grate Stainless Steel Drain Frame Height Extension Ring (5/8” - 1”) (Optional) - This must be fixed in place using solvent cement. Height Adjustment Ring (1/4” - 5/8” rotate counter-clockwise to increase height - This must be fixed in place using solvent cement.
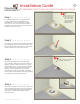
Installation Guide 4 for adjustable fusion shower pan surface mounted on concrete Step 1 > > > > > > > > > For optimal performance, it is imperative there is a level surface prior to installation of new Adjustable Pan. Check existing floor to make sure it is level. If it is not, please correct prior to installation. Place the pan in desired location and check to make sure it is level.
Installation Guide 5 for adjustable fusion shower pan surface mounted on concrete Step 5 > > > > > > > > > Once plate is set in the desired location, mark the orientation on the plate and the pan. This will ensure that you have the plate properly aligned when you go to reinstall it later. While in place, note the location of the drain and remove enough concrete for the installation of the waste pipe, and drain body.
Installation Guide 6 for adjustable fusion shower pan surface mounted on concrete Step 9 > > > > > > > > > To prep for permanent installation, remove the Adjustable pan from the surface. Apply a generous amount of construction adhesive to the concrete floor. Place the pan down into position and apply pressure to adhere the pan to the concrete. Step 10 > > > > > > > > If required you may drill and countersink anywhere on the surface of the Adjustable Fusion Pan.
Installation Guide 7 for adjustable fusion shower pan surface mounted on concrete Gasket Clamp Step 13 > > > > > > > > You now want to attach the Drain adapter flange to the Fusion Pan. First apply a bead of caulk to the underside of the drain adapter flange. Lightly push the flange into place, and screw it down using the four ¾” screws provided. Remove any excess caulk that squeezes out.
Installation Guide 8 for adjustable fusion shower pan surface mounted on concrete Step 17 > > > > > > > > Using the 5” crack isolation tape provided, cut strips of tape to length, to cover all seams (Corner seams, wall/floor seams, pan/floor joint). Put pieces aside. If you are creating full wet room, you will need to tape any seams throughout the entire room. If you are only waterproofing the shower zone, you will only need to tape the seams up to 2 feet outside the shower area.
Installation Guide 9 for adjustable fusion shower pan surface mounted on concrete Step 21 > > > > > > > > Gasket Clamp Now attach the clamping ring. Apply solvent cement to inside of clamping ring. Press firmly into position and allow the solvent to set. NOTE: Do not allow the solvent cement to come into contact with the membrane Drain Adapter Flange Gasket Membrane Step 22 > > > > > > > > Begin the application of the liquid waterproofing membrane.
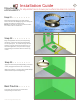
Installation Guide 10 for adjustable fusion shower pan surface mounted on concrete Step 24 > > > > > > > > In order to set the correct height of the grate frame, you may need to use the height extension ring (see diagram to the right). If the height extension ring is required, it will need to be fixed to the height adjustment ring using solvent cement. The grate frame can now be attached to the height adjustment or extension ring, depending on tile thickness.
Installation Guide 11 for adjustable fusion shower pan surface mounted on concrete Step 27 > > > > > > > > Once your tiling is complete. Grout the floors and walls. Finalize by adding the drain grate. Your Adjustable Fusion Pan installation is now complete.
Installation Guide 12 for adjustable fusion shower pan surface mounted on concrete Adjustable Fusion Shower Pan - Cutting and Drilling guideline Cutting and Drilling Guidlines Do not cut into central solid oval section Maxim um cut Maxim um cut Maxim um cut Maxim um cut Fig.1 Cut using an old or disposable handsaw. Additional timber F ig . 2 Cu t t o l e n g t h . Additional timber Additional timber F ig . 3 C u t t o a c c o m m o d a t e d ia g o n a l w a ll . Fig.