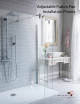
Adjustable Fusion Pan Installation Photos
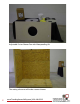
Adjustable Fusion Shower Pan with Waterproofing Kit The setting where we will make a corner shower. 2 www.TrendingAccessibility.
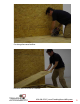
Check for level on the existing floor. Place the pan on the subfloor. Pull the pan away from the walls in order to make a larger shower footprint. 856-488-9535 | www.TrendingAccessibility.
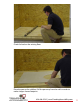
Trace the outline of the pan. Set the blade depth of the circular saw to the depth of the subfloor. 4 www.TrendingAccessibility.
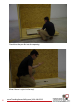
Cut along the traced outline. Remove the cut section of subfloor. 856-488-9535 | www.TrendingAccessibility.
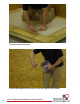
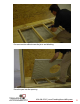
Check that the pan fits into the opening. What if there is a joist in the way? 6 www.TrendingAccessibility.
Rotate the adjustable disc to avoid the obstructions. Then mark the position. Install blocking around the perimeter. 856-488-9535 | www.TrendingAccessibility.
Install blocking around the perimeter. Make sure the pan is level. 8 www.TrendingAccessibility.
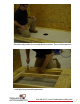
Put construction adhesive on the joists and blocking. Place the pan into the opening. 856-488-9535 | www.TrendingAccessibility.
Screw the pan down using all of the holes, taking care not to overtighten. Apply latex caulk around the center opening. 10 www.TrendingAccessibility.
Place the adjustable disc in the marked position and pre-drill the holes. Screw down the adjustable disc. 856-488-9535 | www.TrendingAccessibility.
Rough up the surface of the pan. Make sure to completely sand off the UPC sticker. Install tile backerboard on the floors and the walls. 12 www.TrendingAccessibility.
Vacuum up all dust and debris. Fill in any gaps over 1/8” with latex caulk. 856-488-9535 | www.TrendingAccessibility.
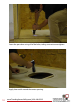
Place the washers for the drain adapter through the hole. Mark the 4 holes for the drain. 14 www.TrendingAccessibility.
Pre-drill the 4 holes for the drain. Apply a ring of latex caulk around the drain plate. 856-488-9535 | www.TrendingAccessibility.
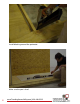
Screw down the drain plate, taking care not to overtighten. Thread the top of the drain adapter into the bottom piece (which is already connected to the waste line). Tighten with a builder’s square. 16 www.TrendingAccessibility.
Stir the waterproofing. Start in the corners. Always apply the waterproofing underneath and on top of the crack isolation tape. 856-488-9535 | www.TrendingAccessibility.
Press out any air bubbles that may get trapped under the tape. Apply the waterproofing on top of the tape. 18 www.TrendingAccessibility.
Cut sections of the tape for the seams. Press the tape into the seam. 856-488-9535 | www.TrendingAccessibility.
Apply waterproofing on top of the tape. Apply waterproofing on top of the tape. 20 www.TrendingAccessibility.
To install the drain gasket, first apply waterproofing on the pan. Put the gasket in place. 856-488-9535 | www.TrendingAccessibility.
Apply primer and solvent cement to the clamping ring. Press the clamping ring down. 22 www.TrendingAccessibility.
Apply the waterproofing on top of the gasket. All seams have been waterproofed and taped. 856-488-9535 | www.TrendingAccessibility.
Apply the first full coat on the walls with a roller. Cover the floor as well. 24 www.TrendingAccessibility.
Wait for the first coat to dry and then apply the second coat. Rotate the grate frame to be slightly higher than the tile thickness (to account for the tile adhesive). 856-488-9535 | www.TrendingAccessibility.
Mark its position. Apply the primer and solvent cement. 26 www.TrendingAccessibility.
The metal part of the grate frame can be rotated independently to match the directionof the tile. The grate itself is a friction fit. Press down firmly. You are now ready to tile! 856-488-9535 | www.TrendingAccessibility.
www.TrendingAccessibility.com Info@TrendingAccessibility.