
Manual


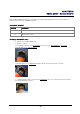


Table Of Contents
- Safety precautions
- Notes on use of these operating instructions
- CHAPTER 1 Your LanXPLORER
- AA Alkaline
- 4 hours under normal operating conditions
- Charging time:
- Operating temperature (min./max.):
- Storage temperature (min./max.):
- Relative humidity:
- 1.3. Equipment included Basic version
- 2.1. LanXPLORER
- 2.2. Power options
- 3.1. Principles
- 3.2. System
- 3.3. RJ45
- 3.4. Fibre-optic cable
- 3.5. Tests
- 3.6. IP
- 3.7. VLAN
- 3.8. WiFi
- 3.9. 802.1x
- 5.1. Ports
- 5.2. Passive wiring
- 5.3. Active wiring
- 5.4. Inline Test
- 5.5. Fibre-optic cable
- 5.6. WiFi
- 6.1. Test summary
- 6.2. Autotest
- 6.3. Wiremap test
- 6.4. Testing a passive route without remote / active Remote
- 6.5. Netmap
- 6.6. Verify
- 6.7. Ping
- 6.8. Voice over IP (VoIP)
- 6.9. Trace Route
- 6.10. Blink
- 6.11. Power over Ethernet (PoE)
- 6.12. Loop
- 6.13. PC Diagnosis
- 6.14. Statistics
- 6.15. WiFi
- 7.1. Safety precautions
- 7.2. Instructions for cleaning SFP modules and patch cables
- CHAPTER 2 Instrument description
- CHAPTER 3 Settings
- CHAPTER 4 Test summary
- CHAPTER 5 Test setup
- CHAPTER 6 Test description and procedure
- CHAPTER 7 Wiring test on fibre-optic conductors and SFP modules
- CHAPTER 8 LanXPLORER Firmware Update
- CHAPTER 9 Spare parts - Socket inserts

58
CHAPTER 9
Spare parts - Socket inserts
The LanXPLORER provides the possibility of replacing damaged or worn sockets with the
RJ45 socket insert set (TREND 150058).
Equipment included
Quantity
Description
1 Tool
10 Replacement insert
Changing the socket insert
1. Switch the LanXPLORER off.
2. Remove cables.
3. Carefully push the tool STRAIGHT into the socket. BE CAREFUL - DO NOT
MOVE THE TOOL VERTICALLY!
4. Keeping the tool STRAIGHT firmly pull the insert out from the socket.
5. Using fingers replace a new insert STRAIGHT into the socket and secure in place
by firmly pushing it home.