
Manual

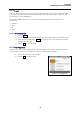
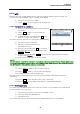


Table Of Contents
- Safety precautions
- Notes on use of these operating instructions
- CHAPTER 1 Your LanXPLORER
- AA Alkaline
- 4 hours under normal operating conditions
- Charging time:
- Operating temperature (min./max.):
- Storage temperature (min./max.):
- Relative humidity:
- 1.3. Equipment included Basic version
- 2.1. LanXPLORER
- 2.2. Power options
- 3.1. Principles
- 3.2. System
- 3.3. RJ45
- 3.4. Fibre-optic cable
- 3.5. Tests
- 3.6. IP
- 3.7. VLAN
- 3.8. WiFi
- 3.9. 802.1x
- 5.1. Ports
- 5.2. Passive wiring
- 5.3. Active wiring
- 5.4. Inline Test
- 5.5. Fibre-optic cable
- 5.6. WiFi
- 6.1. Test summary
- 6.2. Autotest
- 6.3. Wiremap test
- 6.4. Testing a passive route without remote / active Remote
- 6.5. Netmap
- 6.6. Verify
- 6.7. Ping
- 6.8. Voice over IP (VoIP)
- 6.9. Trace Route
- 6.10. Blink
- 6.11. Power over Ethernet (PoE)
- 6.12. Loop
- 6.13. PC Diagnosis
- 6.14. Statistics
- 6.15. WiFi
- 7.1. Safety precautions
- 7.2. Instructions for cleaning SFP modules and patch cables
- CHAPTER 2 Instrument description
- CHAPTER 3 Settings
- CHAPTER 4 Test summary
- CHAPTER 5 Test setup
- CHAPTER 6 Test description and procedure
- CHAPTER 7 Wiring test on fibre-optic conductors and SFP modules
- CHAPTER 8 LanXPLORER Firmware Update
- CHAPTER 9 Spare parts - Socket inserts

Chapter 6
Test Description and Procedure
55
6.15. WiFi
With this test the LanXPLORER can test wireless networks within reception range. An
overview the tests available is given in Table CHAPTER 4.
1. Select the menu "Ports" "WiFi".
2. Select Scan to start recognition of the networks.
6.15.1. Connecting to a network
3. Select a network with which you want make a
connection.
4. Select Join in order to connect with the
network selected.
5. Confirm the screen message with OK if you
want to configure the network.
The device detects and sets the coding type automatically.
6. Select the menu point Code.
7. Enter the network code with the
alphanumeric keys.
8. Save the entry made with OK. You can exit
the menu without saving the changes with
Cancel or Escape.
9. Save the entry made with Apply. You can exit the menu without saving the
changes with Escape.
10. In the option Code type, set ASCII or HEX.
NOTE:
The information required for setting the network has to be requested from your system administrator.
If a Default Accesspoint has been saved in the LanXPLORER, when activated, the device connects to
the WiFi function automatically using this Accesspoint.
11. Select Apply in order to take over the settings.
12. Select Join in order to connect with the network.
13. Confirm the screen message with OK.
The SSID of the network with which you are connected will be displayed in bold and
underlined.
14. Select Save to store all test results in the current job.
15. Select Details to view further information on individual networks.
6.15.2. Performing tests
The name of the IP address and of the network is shown on the standby screen with which
the device has been connected.
1. Select the menu point "Tests" on the standby screen.
6. Select the desired individual test.
7. Perform the test.
The result is stored in the short-term memory and displayed in the test summary.
53