
Manual

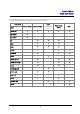

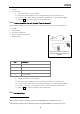
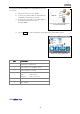
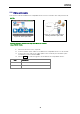
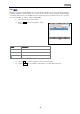
Table Of Contents
- Safety precautions
- Notes on use of these operating instructions
- CHAPTER 1 Your LanXPLORER
- AA Alkaline
- 4 hours under normal operating conditions
- Charging time:
- Operating temperature (min./max.):
- Storage temperature (min./max.):
- Relative humidity:
- 1.3. Equipment included Basic version
- 2.1. LanXPLORER
- 2.2. Power options
- 3.1. Principles
- 3.2. System
- 3.3. RJ45
- 3.4. Fibre-optic cable
- 3.5. Tests
- 3.6. IP
- 3.7. VLAN
- 3.8. WiFi
- 3.9. 802.1x
- 5.1. Ports
- 5.2. Passive wiring
- 5.3. Active wiring
- 5.4. Inline Test
- 5.5. Fibre-optic cable
- 5.6. WiFi
- 6.1. Test summary
- 6.2. Autotest
- 6.3. Wiremap test
- 6.4. Testing a passive route without remote / active Remote
- 6.5. Netmap
- 6.6. Verify
- 6.7. Ping
- 6.8. Voice over IP (VoIP)
- 6.9. Trace Route
- 6.10. Blink
- 6.11. Power over Ethernet (PoE)
- 6.12. Loop
- 6.13. PC Diagnosis
- 6.14. Statistics
- 6.15. WiFi
- 7.1. Safety precautions
- 7.2. Instructions for cleaning SFP modules and patch cables
- CHAPTER 2 Instrument description
- CHAPTER 3 Settings
- CHAPTER 4 Test summary
- CHAPTER 5 Test setup
- CHAPTER 6 Test description and procedure
- CHAPTER 7 Wiring test on fibre-optic conductors and SFP modules
- CHAPTER 8 LanXPLORER Firmware Update
- CHAPTER 9 Spare parts - Socket inserts

Chapter 3
Settings
32
3.9. 802.1x
To test networks that use 802.1x security, the tester must be set up as follows:
Import client certificates and root certificates as follows:
• On your PC, create a directory, name it ‘certs’ and copy the required client and root
certificates to that directory.
Note
• Root certificates must be of the file type .pem. Client certificates must be
of the file type .p12.
• Copy the directory to a USB key and insert it into the USB port.
• From the home screen press the soft key SETUP (F3).
• Select the icon 802.1x. The 802.1x setup screen is displayed.
• Press soft key CERTS (F1) to load the certificates. The loaded certificates will remain
until further certificates are loaded or a factory reset is performed.
When entering the 802.1x setup details, scroll to each field, press Enter and select from the
drop down menu or look up table as required. Press enter again to return to the 802.1x
setup screen. RESET clears all certificate data from the setup screen.
Username and Password fields will display the QWERTY keyboard. When you have entered
the Username/Password, press OK to return to the 802.1x setup screen.
The tester’s time and date must be correct before 802.1x will work.
• Set the ‘802.1x’ field to Enable.
• Select the required EAP Method from the drop down menu in the ‘EAP Method’
field. See Notes 1 to 4 below.
• Scroll to the ‘Certificate’ field and select the required certificate from the look up
table.
• Enter a username and password (when required).
• Scroll to the ‘Root Cert’ field and select the required certificate from the look up
table (when required).
• Press the soft key APPLY (F2). You can now connect through the 802.1x port.
Notes
1) Completing the fields ‘Client Certificate’ and ‘Certificate Password’ is
required only when the EAP Method is: EAP-TLS, Any or, the Tunneled
Method is TLS.
2) The Tunneled Method and Root Certificate options are enabled only
when the EAP Method is
EAP-TLS, EAP-PEAP, EAP-TTLS or Any.