
Manual
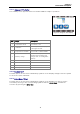


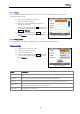

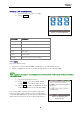
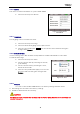
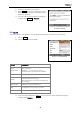
Table Of Contents
- Safety precautions
- Notes on use of these operating instructions
- CHAPTER 1 Your LanXPLORER
- AA Alkaline
- 4 hours under normal operating conditions
- Charging time:
- Operating temperature (min./max.):
- Storage temperature (min./max.):
- Relative humidity:
- 1.3. Equipment included Basic version
- 2.1. LanXPLORER
- 2.2. Power options
- 3.1. Principles
- 3.2. System
- 3.3. RJ45
- 3.4. Fibre-optic cable
- 3.5. Tests
- 3.6. IP
- 3.7. VLAN
- 3.8. WiFi
- 3.9. 802.1x
- 5.1. Ports
- 5.2. Passive wiring
- 5.3. Active wiring
- 5.4. Inline Test
- 5.5. Fibre-optic cable
- 5.6. WiFi
- 6.1. Test summary
- 6.2. Autotest
- 6.3. Wiremap test
- 6.4. Testing a passive route without remote / active Remote
- 6.5. Netmap
- 6.6. Verify
- 6.7. Ping
- 6.8. Voice over IP (VoIP)
- 6.9. Trace Route
- 6.10. Blink
- 6.11. Power over Ethernet (PoE)
- 6.12. Loop
- 6.13. PC Diagnosis
- 6.14. Statistics
- 6.15. WiFi
- 7.1. Safety precautions
- 7.2. Instructions for cleaning SFP modules and patch cables
- CHAPTER 2 Instrument description
- CHAPTER 3 Settings
- CHAPTER 4 Test summary
- CHAPTER 5 Test setup
- CHAPTER 6 Test description and procedure
- CHAPTER 7 Wiring test on fibre-optic conductors and SFP modules
- CHAPTER 8 LanXPLORER Firmware Update
- CHAPTER 9 Spare parts - Socket inserts

Chapter 3
Settings
17
Screen calibration*
1. Select the menu point "Screen Calibration".
2. After the LanXPLORER has automatically restarted touch the cross-hairs,
which appear one after another in each corner and in the middle of the screen,
as precisely as possible with the pointer or a thin pin.
Successful calibration of the screen is confirmed by a check mark. The LanXPLORER
restarts automatically after screen calibration.
3.2.3. Update
The LanXPLORER software can be updated with this menu (see CHAPTER 8).
3.2.4. Jobs
Projects can be created and managed with this menu.
NOTE:
Job management can also be selected directly with the menu point "Jobs" on the standby screen.
The name of the current job directory is shown on the standby screen on the TFT display.
When storing the Autotest it is possible to keep this job directory, activate a job directory
already present or to create a new job directory.
1. Select the menu point "Jobs" to obtain a list of all jobs created on your
LanXPLORER.
Viewing a present job and test details
1. Select a job from the list, to view the test results and their status.
2. Select a test to obtain further details on the test.
3. Select a single test to obtain further details on the test.
Creating a new job
1. Select Options.
2. Select the menu point "New".
3. Select the individual fields and enter the desired information with the
alphanumeric keys.
4. Save the entry made with OK. You can exit the menu without saving the
changes with Cancel or Escape.
5. Save the entry made with Apply. You can exit the menu without saving the
changes with Cancel.