NL - Handleiding elektrische onkruidverwijderaar DE – Original Betriebsanleitung Elektrischer Unkraut- und Moosentferner FR – Mode d’emploi de balai désherbant électrique GB – Manual weed sweeper 1
NL - Handleiding elektrische onkruidverwijderaar Veiligheidsinstructies Bedankt voor uw aankoop van de Trebs elektrische onkruidverwijderaar. Lees vóór gebruik deze handleiding zorgvuldig door om tot de beste resultaten te komen. Bewaar de handleiding altijd samen met het apparaat. BELANGRIJK! Volg bij het gebruik van elektrisch gereedschap altijd de volgende veiligheidsregels.
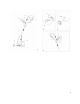
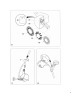
6 Beschermkap 7 Borstel 8 Wiel Montage Montage van de beschermkap (fig. B) • Bevestig de beschermkap (6) zoals aangegeven op de tekening, aan het apparaat. • Monteer de beschermkap met behulp van de schroeven (9). Waarschuwing! Vervang de schermkap als de kap is versleten. Montage van het wiel (fig. C) • Plaats de as van het wiel (8) in het montage-gat (10). • Druk de as stevig op zijn plaats. Montage en aanpassing van het extra handvat (fig.
• Zorg ervoor dat de onderkant van het apparaat recht wordt gehouden. • Geleid het apparaat op constante snelheid over het te bewerken oppervlak. • Voor optimale resultaten wordt aangeraden om het apparaat eerst op een klein gedeelte van het oppervlak te testen. Controleer of de tegels niet beschadigen. • Gebruik het apparaat alleen voor het bewerken van droog onkruid. • Houd het apparaat ut de buurt van harde voorwerpen en planten. • Veeg langere voegen voor kortere voegen.
Invoervermogen: Onbelast toerental: Borsteldiameter: Gewicht: Geluidsdruk: Geluidsvermogen: 400 watt 2000 min-1 100mm. 2 kg.
DE – Bedienungsanleitung Elektrischer Fugenreiniger Sicherheitshinweise Vielen Dank für Ihr Vertrauen bei der Wahl dieses Geräts. Für beste Ergebnisse lesen Sie bitte diese Bedienungsanleitung vor der Benutzung des Geräts. Bewahren Sie die Bedienungsanleitung stets gemeinsam mit dem Gerät auf. WICHTIG! Beachten Sie bei der Benutzung von Elektrowerkzeugen stets die nachstehenden allgemeinen Sicherheitshinweise.
• Benutzen Sie das Gerät nur aufrecht, mit der Bürste auf den Boden gerichtet. Schalten Sie das Gerät nicht in anderer Stellung ein. • Halten Sie stets Hände und Füße von der Bürste fern. • Benutzen Sie nur vom Hersteller empfohlene Bürsten. Bürsten dürfen nicht auf Maschinen montiert werden, deren Drehzahl über der höchstzulässigen Bürstendrehzahl liegt. Beschädigte Brüsten dürfen nicht verwendet werden.
Benutzen Sie Arbeitsschuhe Nicht benutzen wenn Personen in der Nähe des Produkts stehen Montage Schutzabdeckung montieren (Abb. B) • Montieren Sie die Schutzabdeckung (6) am Gerät, wie dargestellt. • Befestigen Sie die Schutzabdeckung mit den Schrauben (9). Warnung! Tauschen Sie die Schutzabdeckung aus, wenn die Klappe beschädigt ist. Laufrad montieren (Abb. C) • Setzen Sie die Achse des Laufrades (8) in die Öffnung (10) ein. • Drücken Sie die Achse fest an. Führungsgriff montieren und einstellen (Abb.
Bedienungshinweise • Schließen Sie das Gerät an einem geeigneten Verlängerungskabel an. • Haken Sie das Verlängerungskabel hinter dem Clip ein (Abb. G). • Halten Sie das Gerät mit beiden Händen. • Achten Sie darauf, dass die Unterseite des Geräts stets waagerecht ist. • Führen Sie das Gerät mit gleichmäßiger Bewegung über die zu bearbeitende Fläche. • Für beste Ergebnisse empfehlen wir, das Gerät zunächst auf einer kleineren Fläche zu testen.
Trebs Service Center Service Hotline: (0049) 0211 381007 Technische Daten Elektrischer Fugenreiniger Modell: Netzspannung: 230 V, 50 Hz Leistung: 400 Watt Leerlaufdrehzahl: 2000 /min Bürstendurchmesser: 100 mm Gewicht: 2 kg A-gewichteter Schalldruck: 74 dB(A)K=3 dB(A) A-gewichtete Schallleistung: 94 dB(A) K=3 dB(A) Vibration 1.307m/s2 K=1.
EN60335-1/A13 :2008 EN1083-2 :1997 EN62233 :2008 EN60335-1/A13 :2008 EN1083-2 :1997 EN62233 :2008 Trebs BV Thermiekstraat 1 6361 HB Nuth Die Niederlande www.trebs.
FR – Mode d’emploi de balai désherbant électrique Consignes de sécurité Nous vous remercions d'avoir choisi cet appareil. Pour obtenir un résultat optimal, veuillez lire attentivement ce manuel avant d'utiliser l'appareil pour la première fois. Rangez ce manuel et l'appareil au même endroit.
3 Poignée principale 4 Poignée de guidage 5 Tuyau télescopique 6 Protection 7 Brosse 8 Roue Montage Assembler la protection (schéma 8) • Assemblez la protection (6) sur l'appareil comme illustré. • Fixez la protection à l'aide des vis (9). Attention ! Remplacez la protection lorsque le rabat est usé. Installer la roue (schéma C) • Insérez l'axe de la roue (8) sur l'œillet (10). • Poussez sur l'axe pour l'enclencher.
Utilisation de l'appareil sur dalles • Branchez l'appareil sur une rallonge adéquate. • Accrochez le fil de la rallonge derrière le sabot (schéma G). • Utilisez vos deux mains pour tenir l'appareil. • Vérifiez que le dessous de l'appareil reste bien à plat. • Guidez l'appareil à vitesse constante sur la surface à nettoyer. • Pour obtenir un résultat optimal, il est conseillé de tester l'appareil sur une petite partie de la surface. Vérifiez que les dalles ne sont pas abimées.
Ramenez l'appareil au magasin où vous l'avez acheté pour que le magasin l'achemine au centre de réparation. Nous n'acceptons pas les appareils renvoyés sous garantie ou directement par le client.
GB – Manual weed sweeper Safety Instructions Thank you for your confidence in choosing this machine. To achieve best results, read this manual carefully before using the machine for the first time. Always store the manual together with the machine. IMPORTANT! When using electrical tools, always observe the following basic safety rules. Safe operation of the machine requires that you read the operating manual and safety instructions and comply with them before using the machine for the first time.
4 Guide handle 5 Telescopic tube 6 Guard 7 Brush 8 Wheel Assembly Mounting the guard (fig. B) • Mount the guard (6) to the appliance as shown. • Fit the guard using the screws (9). Warning! Replace the guard when the flap is worn. Mounting the wheel (fig. C) • Insert the axle of the wheel (8) into the mounting hole (10). • Firmly push the axle into place. Mounting and adjusting the guide handle (fig. D) • Mount the guide handle (4) to the appliance as shown.
Using the tile machine • Connect the appliance to a suitable extension cord. • Hook the extension cord behind the clamp (fig. G). • Hold the appliance with both hands. • Make sure the underside of the appliance is kept level. • Guide the appliance at a constant speed over the surface to be worked. • For optimum results it is recommended to test the appliance on a small part of the surface. Check if the tiles do not damage. • Only use the appliance for working dry weed.
Technical data Weed Sweeper Model: Rated Voltage: 230 V 50 Hz Input Power: 400 watt No load speed: 2000 min-1 Brush diameter: 100mm. Weight: 2 kg.