TRBOnet Web Console User Guide Version 5.7 World HQ Neocom Software 8th Line 29, Vasilyevsky Island St. Petersburg, 199004, Russia US Office Neocom Software 150 South Pine Island Rd., Suite 300 Plantation, FL 33324, USA Internet Email: info@trbonet.com WWW.TRBONET.
Notices This document is for informational purposes only. Neocom Software offers no warranties, express or implied, in this document. Neocom and the Neocom logo, TRBOnet and the TRBOnet logo are either registered trademarks or trademarks of Neocom Software, Ltd. MOTOROLA, MOTO, MOTOROLA SOLUTIONS and the Stylized M logo are trademarks or registered trademarks of Motorola Trademark Holdings, LLC.
Contents 1 Introduction ........................................................................................................................................................1 1.1 About This Guide ................................................................................................................................1 1.2 About TRBOnet Web Console .......................................................................................................1 1.3 About TRBOnet by Neocom Software .....
Introduction 1 Introduction 1.1 About This Guide This document is intended for MOTOTRBO radio network administrators responsible for the dispatch operations. It provides guidance on the installation, configuration, and maintenance of the TRBOnet Web Console application. 1.2 About TRBOnet Web Console TRBOnet Web Console is a special online application. It is an extension for TRBOnet Dispatch Software which allows dispatchers to get access to the system via a Web browser.
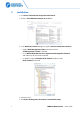
2 Installation • Click Start>Control Panel>Programs and Features. • Click the Turn Windows features on or off link. • In the Windows Features dialog box, expand Internet Information Services: Expand Web Management Tools and make sure that IIS Management Console is selected. Go to World Wide Web Services>Application Development Features and make sure all of them are selected. In addition, expand Common HTTP Features make sure that Static Content is selected. • Restart your PC.
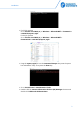
Installation • For 32-bit systems: Go to This PC>Local Disk (C: )> Windows > Microsoft.NET > Framework > v4.0.30319/aspnet_regiis. For 64-bit systems: Go to This PC>Local Disk (C: )> Windows > Microsoft.NET > Framework64 > v4.0.30319/aspnet_regiis. • Drag the aspnet_regiis file into the Command Prompt then press the space bar and add the -i key. Then press the Enter key: • Go to Control Panel > Administrative Tools.
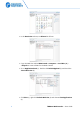
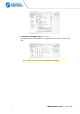
• In the Restriction column, set Allowed in all lines. • Copy the Web Site archive WebConsole to Computer > Local Disc (C: ) >inetpub to create a folder for the Web Console. • Go to Application Pools (1). Double-click DefaultAppPool (2) and check the .
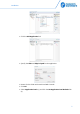
Installation • Click the Add Application link. • Specify the Alias and Physical path for the application: • Browse for the folder with unarchived Web Console. • Click OK.
• Set Enable 32-Bit Applications to True (3). The Web Console will be added as an application to under the Default Web Site: Note: Make sure your account has sysadmin privileges.
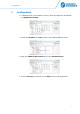
Configuration 3 Configuration • If TRBOnet Server is not installed on the PC, select the application and doubleclick Application Settings: • Specify the IP address and Port of the PC with installed TRBOnet Server: • Right click TRBOnet Web Console and choose Edit Permissions.
• Select User in the Users list. In the Allow column, select Write: • Click Apply. • Click OK. To open TRBOnet Web Console: • Go to Internet Information Services (IIS) Manager > Connections >Sites > Default Web Site > TRBOnet • Right-click it and choose Manage Application > Browse. TRBOnet Web Console is now ready for operation.
Operation 4 Operation 4.1 Connecting to TRBOnet Server • Launch the browser. • In the browser's address bar, enter the IP address of the PC with the installed TRBOnet Web Console, and the path (for example, 10.10.100.99/TRBOnet). Note: For the path, see section 2, Installation, IIS Manager>Add Application>Alias As a result, the TRBOnet Login page will open: • Login Enter the User Name registered in the TRBOnet Dispatch Console Users list. • Password Enter the user password. • Click Connect.
4.2 Radio List The Radio List pane is located on the left and contains the list of radios. From this pane, you can perform the following tasks. Click the button to see the selected radio in the center of the map. Click the the map. button to button to display a route traveled by the selected radio on Specify the From and To date and time. Select the Optimize Route option to group all points in a 100 meter radius. 4.2.1 Click the button to request a location of the selected radio.
Operation Note: The dispatcher can disable a radio when they have relevant Access Rights. 4.3 Map 4.3.1 Map Layers • Click the small plus button on the right of the Map pane. • Choose the map layer to display in the Map pane. • In the Overlays list, select whether to display Regions, Map Objects and Radios on the map. Just select/deselect the corresponding check box. 4.3.2 Zoom In/Out • Click the large plus button on the left of the Map pane to zoom in the map.
4.3.4 Filter Radios You can filter the display of radios on the map. To do this, use the colored car buttons at the top of the Map pane. • Click to remove radios that are online and have a detected beacon position from the map view. Click this button again to bring them back to be displayed. • Click to remove radios that are online and have a detected GPS position from the map view. Click this button again to bring them back to be displayed.
Operation 4.3.6 Text Messages With TRBOnet Web Console, you can send text messages to radios/radio groups/dispatchers. • Click the Messages tab at the top of the window. • Click the Send Text button. In the Send Text Message window that appears: Enter the text of the message. Select the radios/radio groups/dispatchers to send the message to. Select the Send to Offline option to send the message to offline radios.
4.4 Job Ticketing With TRBOnet Web Console, you can create, assign, and track job tickets through the radio network. • Click the Job Ticketing tab at the top of the window. In the upper pane, you see the list of created job tickets. In the lower pane, there are assigned job tickets. 4.4.1 Add a Job Ticket • Click the Add button. • Ticket ID This value will be set automatically once the ticket has been created. • Text Enter the text message in this box.
Operation • Click OK. Once you have added a ticket, it will appear in the list of tickets in the upper pane. 4.4.2 Assign a Job Ticket Select the job ticket in the upper pane, and click the Assign button. • In the list, select a radio(s), radio or logical group to which to assign the job ticket. • Click OK to assign the task to selected radio(s). As a result, the selected radio will receive the job ticket. The assigned job ticket will appear in the upper pane.
4.5 Reports • Click the Reports tab at the top of the window. • In the right pane, select report parameters and click Generate Report. Once the report is generated, you will see it in a separate tab of your Web browser. You can print the report, save it as a file, and so forth.
Operation 4.6 Alarms When an alarm is received from a radio, the radio icon will turn red, and a corresponding Information window will pop up displaying the radio's name, coordinates, and speed.