
Printer User Manual


Revision J
1
7 " )*
7 " )*7 " )*
7 " )*=# >=# 2)4>
=# >=# 2)4>=# >=# 2)4>
=# >=# 2)4>
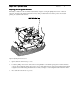
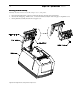
The Printer Assembly is held to the cabinet base by 4 phillips head screws located at the front and rear sections of
the Printer Assembly.
1. Press the 2<7 Button to release the rear paper cover from the console.
2. Open the front cover.
3. Slowly remove the 4 phillips head screws that hold the mid-frame to the printer’s base.
4. Disconnect the knife harness, and separate the printer assembly (mid-frame) from the cabinet base.
5. Unhook the knife harness from the PC Board.
Figure 8 Removing Printer Midframe from Cabinet Base