
Installation Guide


Prof Install Guide for M900S Access Point and Subscriber Unit
5
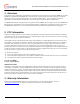
6.1 Yagi Antenna
To install the Cushcraft Yagi PN # PC9013N antenna please see the drawing below
Add Drawing of antenna mounting
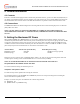
6.2 Omni Antenna
To install the Comtelco PN #BS915XL7 antenna, please follow the instructions below. These antennas recommended
for access points only, but may be used with subscriber units.
Insert Omni mounting picture
7. Antenna Alignment (Applies to SU Only)
To align the SU antenna for optimal performance, follow the procedure below.
Once the SU is installed and aimed in the general direction of the AP, it is time to perform an RSSI test to determine the
signal strength from the AP, and to precisely align the SU antenna for maximum signal strength.
SU Antenna Alignment Procedure
1. Ensure AP is in opmode AP
2. Telnet into the SU (while in opmode “OFF”) or access the radio via hyperterminal
3. Type command SSRSSI <channel> <e> - Example SSRSSI 3 e (chan. 3, external antenna port)
4. Telnet session screen will begin a continuous readout of the received signal strength.
5. As you view the RSSI reading, move the antenna in the horizontal and vertical planes until the maximum RSSI
reading is achieved. For short links you can expect an RSSI of –70 dBm or better. For longer links and RSSI
of –80 dBm is acceptable. Any RSSI of less than –85 dBm may be too weak for the radios to reliably associate
and pass data.
6. If it is not possible to receive an adequate RSSI reading, it may be necessary to reorient the AP (up/down,
left/right), to increase the output power of the AP, or to move the SU to a location with better line-of-sight
conditions to the AP.
Once you are satisfied with the RSSI reading, tighten down the antenna in the optimum position. To stop the RSSI
continuous readout, hit SPACE, then ENTER.
Note: The RSSI LED indicators will illuminate as the signal gets stronger , providing a guide for aligning the antenna .
This concludes the installation process.