
Use And Care Manual

6
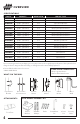
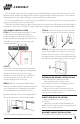
ASSEMBLY
CIRCLE FRAME CENTER MOUNT
INSTALLATION
STEP 1. With the footplate detached, drop
the jack into the hole located in the trailer’s
coupler. Note that the support plate on the
jack has one point that is flattened. This
corner should face forward, toward the front
of the coupler.
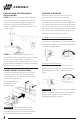
STEP 2. You can now fit the jack to the
coupler. Bolt sizes are specific to your coupler
and are not included with your Blackout
Series Jack purchase. Alternatively, the center
jack can also be welded for a more permanent
attachment to the trailer.
SWIVEL MOUNT INSTALLATION
Place the mounting bracket onto an 8 inch
clearing on your frame where the jack can
freely rotate from its vertical position to its
horizontal stow position.
Secure with the four
included bolts at
desired height.
WARNING The mount bracket is only
to be installed on trailer frames that are
rectangular in profile. Cylindrical frames are
not compatible with the mount bracket.
STORING THE DEVICE
After use, lower your jack until your trailer
frame sits level. If storing, ensure that
the trailer frame is jacked to level height.
Alternatively, the jack’s stow position will allow
it to remain attached to the trailer while being
towed. To stow the unit, secure the trailer to a
tow vehicle then crank the jack handle until the
inner jack tube is fully withdrawn and choose
between the following two options:
Stowing the Pipe Mount/Bracket Mount
Remove the cotter and clevis/stow pin and
rotate the unit 90 degrees. Restore the clevis
and stow pins while the unit remains attached
to the mounting bracket.
Stowing the Swivel Mount
Pull the set pin by the ring away from your
trailer frame and rotate the unit 90 degrees.
Release the pin and the Jack will lock into
place.
WARNING Failure to lock in the pins and bolt
prior to trailering with the unit in the stowed
position may result in the unit becoming
dislodged during movement.