
Installation Guide


To avoid this problem, ensure that concrete suboors are constructed according to the American Concrete I
nstitution’s guidelines (ACI’s 302.2 Guide). To check current conditions, a calcium chloride test (ASTM F1869)
and a RH test using in situ Probes (ASTM F2170) is necessary. If the level of vapor emissions / hydrostatic
pressure exceeds 6lbs and /or 90% RH, a moisture barrier must be installed over the concrete or you must use
multi-use LVT adhesive for the install.
Note:Newconcreteneedstocureforatleast60daysbeforeinstallingooringmaterials.
If considering Radiant heat, only Hydronic radiant heat can be used. The heating components must have a
minimum of 3/8” separation from the product. System must be operational for a minimum of two weeks prior to
installation. Five days prior to installation, the temperature should be reduced to 65⁰ F (18⁰ C). After installation,
the temperature can be raised gradually (5⁰ F per hour) to a maximum operation temperature of 85⁰ F (29⁰ C).
An in-oor thermostat is recommended to avoid overheating. A transition strip must be used for any installation
longer than 40 linear feet and/or wider than 30 linear feet. It is also suggested to use T-Molding in doorways.
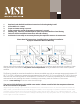
Installation
Remove the tongue (on the long side) from the rst row of planks. This will ensure that the decorative surface of
the ooring is under the nished trim when installed. Use a utility knife to score through the tongue several times
until it easily snaps off (Figure A).
Note:Therstrowofplanksmayneedtobetrimmedlengthwiseforabettertattheendoftheinstallation.
Measuretheroomanddividebythewidthoftheplank.Ifthereisaremainderoflessthan2”,therstrow
willneedtobetrimmedbythatamount.
• Starting in the left hand corner, place the rst plank with its trimmed side towards the wall. Use spacers
along each wall to maintain an expansion gap of 1/4” (7-8mm) between the wall and the ooring (Figure B).
• Attach the ends of the 1st plank and the second plank by lifting the 2nd plank and inserting the tongue on
the short side into the groove of the rst plank and lowering it into place. Line up edges and corners care
fully (Figure C).
• Continue along the wall until you reach the last full plank, connecting each plank in manner described
above. To t the last plank, turn plank over (face down). Place the plank in the corner so the tongue on the
short end touches the adjacent wall. Measure overlap between the installed plank and the last plank
(Figure D1 & D2).
• Using a sharp utility knife and a straight edge, score a line on the top surface of the plank. The plank
should split on the score line with little effort. Use saw to cut plank to size. The plank should split on the
score line with little effort. Use saw to cut plank to size.
Note:theendpiecesmustbelongerthan8”.Thismayrequirecuttingaplanktostartarowdependingonthe
sizeoftheroom.
msisurfaces.com
Page 3