
Installation Guide

CERAMIC INSTALLATION GUIDE
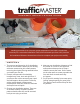
1. Beginlayingthetilefromthecenterof
theroom,usingyourreferencelinesas
yourguide.
2. Spreadthinsetwiththenotchededgeofa
trowel.Largertilesrequiremorethinset
andalargernotchedtrowel.
3. As you lay your tile, you can use plastic
spacerstohelpensureyouhavestraight
groutlines.Youwillremovethespacers
beforethethinsetdries.
4. Cleanupanyexcessthinsetimmediately
usingthemanufacturerʼsinstructions.
5. Afterafewrowsoftileareinstalled,set
themwithatilelevelandamallet.
6. As you reach the perimeter of the room,
cutandadjusttilestocompleteyour
installation. A wet cut tile saw is
recommendedforcuttingporcelain.Do
notdrycutusingmotorizedequipment
duetothepotentialforexposureto
harmfulsilicadust.Useawetsawora
scoreandsnaptoolwhencuttingis
necessaryduringtheinstallationprocess.
7. Allowthetiletosetaccordingtothe
manufacturerʼsinstructions.Groutthetile.
8. Cleanthetilesurfacewithadampsponge
andcleanwater.
1 2
3 4
5 6
7 8
however, opt for a neutral pH cleaner that will not
affectthenish.Youcanndneutralcleanersat
mosthomecentersandtileshowrooms.Always
testthecleaneronasmallarearst.Iftileor
stoneisheavilysoiled,werecommendthata
professionalcleaningcompanydeterminesthe
propercleaningtechnique.
Aswithanyooringmaterial,generalcleaning
techniquesofporcelainandceramictiledepend
onthesurface,textureandconditionofthe
surface.Waterandasoftspongewillusuallybe
enoughtocleanthesurfaceofMS International
ceramicandporcelainproducts.
Ifyoucleanwithsomethingotherthanwater,
INSTALL ATION
MAINTENANCE TIPS