
Installation Guide


I
nst
a
lla
t
io
n
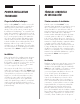
sho
u
ld
st
a
r
t
in
a
c
o
rne
r
a
nd
p
r
o
c
e
e
d
f
r
o
m
t
he
wa
ll
wit
h
t
he
u
nd
e
r
-
e
d
g
e
f
a
c
ing
ou
t
a
wa
y
f
r
o
m
t
he
wa
ll
(
Figu
re
1
)
.
Allow
a
g
a
p
o
f
1
/4
"
(
6
mm)
minimu
m
f
o
r
su
b
f
lo
o
r
mo
ve
me
nt
,
whic
h
shou
ld
b
e
c
o
ve
r
e
d
b
y
mo
ld
ing
.
T
r
im
o
ff
t
he
t
o
p
ove
r
-
e
d
g
e
f
a
c
ing
t
he
wa
ll
(
t
he
e
nt
ir
e
le
ng
t
h
of
t
he
f
ir
st
r
o
w
a
s
we
ll
a
s
t
he
o
ve
r
-
e
d
g
e
on
t
he
sho
r
t
sid
e
o
f
t
he
f
ir
st
p
la
nk
)
(
Figu
re
2
)
.
Whe
n
se
c
u
r
ing
t
wo
p
la
nk
s
t
og
e
t
he
r,
y
o
u
sho
u
ld
a
ng
le
t
he
se
c
o
nd
p
la
nk
b
y
4
5
d
e
g
r
e
e
s
int
o
t
he
c
o
r
r
e
sp
o
nd
ing
e
d
g
e
o
f
t
he
f
ir
st
p
la
nk
.
T
he
ove
r
-
e
d
g
e
is
a
lwa
y
s
p
la
ced
o
n
t
o
p
o
f
t
he u
nd
er-
ed
ge.
S
t
a
r
t
ing
a
t
o
ne
end
o
f
t
he
p
la
nk
,
u
se
one
ha
nd
t
o
hold
t
he
p
la
nk
a
nd
t
he
ot
her
ha
nd
t
o
ro
ll
t
he
ed
ge int
o
p
la
ce
f
o
r
a
t
ight
f
it
. Be ca
ref
u
l
t
o
k
eep
t
he sea
ms
t
ight
.
Y
ou
ca
n p
u
sh t
he
p
la
nk
slight
ly
a
ga
inst
t
he a
d
jo
ining
p
la
nk
t
o
crea
t
e
a
t
ight
sea
m,
if
necessa
ry
a
f
t
er
t
he
co
nnect
io
n
ha
s
b
een
ma
d
e.
I
f
y
o
u
r
sea
m
d
o
es
no
t
a
p
p
ea
r
t
o
b
e
t
ight
,
y
o
u
ca
n
immed
ia
t
ely
p
u
ll
a
p
a
r
t
t
he
p
la
nk
s
a
nd
rea
p
p
ly
it
.
S
lo
wly
sep
a
ra
t
e
t
he
t
o
p
p
la
nk
a
wa
y
f
ro
m
t
he
b
o
t
t
o
m
p
la
nk
a
nd
simp
ly
rea
p
p
ly
t
hem.
Be
ca
ref
u
l
no
t
t
o
p
u
ll
t
he
p
la
nk
s
a
p
a
r
t
t
o
o
f
a
st
a
s
y
o
u
co
u
ld
rip
o
r
d
a
ma
ge
t
he
Grip
S
t
rip
™
.
Y
o
u
ha
ve a
cou
p
le of
minu
t
es
of
“o
p
en
t
ime" in which
y
o
u
can re-work the seams before any
damage occ
urs to the adh
esive on the
GripStrip. Th
e l
ess
pressure applied to
allure
®
, th
e l
on
ger this
“open
time".
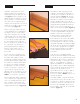
Wh
en
in
s
tal
l
in
g th
e plank, stagger th
e
row
s s
o th
at th
e s
hort edge (6") seams
are not in a s
traight un
ifor
m l
in
e and
hav
e a s
tagger of a min
imum of 6"
from row to row. We recommen
d the
staggered random method
(F
i
g
ure 3)
.
L
a
in
s
t
a
l
a
ció
n
d
eb
e
emp
eza
r
p
o
r
u
n
a
es
q
u
in
a
y
c
o
n
t
in
u
a
r
d
es
d
e
l
a
p
a
red
co
n
el
b
o
rd
e
in
f
erio
r
mira
n
d
o
en
l
a
d
irec
c
ió
n
o
p
u
es
t
a
a
l
a
p
a
red
(
F
i
g
u
ra
1
)
.
Deja
u
n
es
p
a
c
io
d
e
6
mm
(
1
/4
p
u
)
c
o
mo
mín
imo
p
a
ra
q
u
e
el
c
o
n
t
ra
p
is
o
s
e
mu
ev
a
,
d
ic
h
o
es
p
a
c
io
q
u
ed
a
rá
o
cu
l
t
o
a
l
co
l
o
c
a
r
l
a
s
mo
l
d
u
ra
s
.
Co
r
t
a
el
b
o
rd
e
s
u
p
erio
r
f
ren
t
e
a
l
a
p
a
red
(
t
o
d
a
l
a
l
o
n
git
u
d
d
e
l
a
p
rimera
f
il
a
,
a
s
í
co
mo
el
ex
ces
o
d
e
b
o
rd
e
en
el
l
a
d
o
c
o
r
t
o
d
e
l
a
p
rimera
t
a
b
l
a
)
(
F
i
g
u
ra
2
)
.
Cu
a
n
d
o
a
s
egu
res
d
o
s
t
a
b
l
a
s
ju
n
t
a
s
,
d
eb
es
co
l
o
ca
r
l
a
s
egu
n
d
a
t
a
b
l
a
en
á
n
gu
l
o
(
4
5
gra
d
o
s
)
en
el
b
o
rd
e
co
rres
p
o
n
d
ien
t
e.
El
b
o
rd
e
s
u
p
erio
r
s
iemp
re
d
eb
e
es
t
a
r
c
ol
oc
ado
en
c
ima
del
borde
in
ferior
.
Comen
zan
do
por
un
extremo
de
l
a
tabl
a,
us
a
un
a
man
o
para
s
os
ten
erl
a
y l
a
otra
man
o
para
pas
ar
el
rodil
l
o
por
el
borde
y
que
quede
ajus
tada
en
s
u
l
ugar
.
As
egúrate
de que
l
as
un
ion
es
queden
bien
ajus
tadas
.
Si
es
n
eces
ario.
des
pués
de
c
on
ectarl
as
,
puedes
empujar
l
igeramen
te
un
a
tabl
a
c
on
tra
l
a
adyac
en
te
para
c
rear
un
a
un
ión
firme.
Si
l
as
un
ion
es
n
o
quedan
ajus
tadas
,
puedes
l
ev
an
tar
in
mediatamen
te
l
as
tabl
as
y
v
ol
v
erl
as
a
c
ol
oc
ar
.
Separa
l
en
tamen
te
l
a
tabl
a
s
uperior de
l
a
in
ferior
y
s
impl
emen
te
v
uél
v
el
as
a
in
s
tal
ar —
repitien
do
el
Pas
o
Núm.
3
.
Ten
c
uidado
de
n
o
h
al
ar
l
as
tabl
as
muy
rápidamen
te
al
s
epararl
as
ya
que
podrías
romper
o
dañ
ar
el
G
ripStrip
™
.
Tien
es
un
par de min
utos
de
«
período
de
gracia»
en
el
que puedes
v
ol
v
er
a
acomodar las uniones sin que se dañe el
GripStrip de gracia». Mientras menos
presión se le haga a
allure
®
, mayor es el
«período de gracia».
Al instalar la tabla, escalonar las filas de
modo que las uniones de los bordes cortos
(15,24 cm) no queden en una línea recta
y uniforme y tienen un escalonamiento de
un mínimo de 6 pulgadas de fila en fila.
Recomendamos el método de escalonado
aleatorio
(Figura 3)
.
ENGLISH ESPAÑOL
10
Figure / Figura 1
Figure / Figura 2
Figure / Figura 3