P.O. Box 776 Old Saybrook, CT 06475-0776 Place Postage Here. Or for additional security enclose in a envelope.
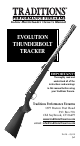
In-Line Muzzleloader Owner’s Manual EVOLUTION THUNDERBOLT TRACKER IMPORTANT! Thoroughly read and understand all of the instructions and warnings in this manual before using your Traditions firearm. Traditions Performance Firearms 1375 Boston Post Road P.O. Box 776 Old Saybrook, CT 06475 www.traditionsfirearms.com email: info@traditionsfirearms.
TRADITIONS’ WARRANTY PROTECTION INCLUDED WITH YOUR NEW GUN Quality, pride and old world craftsmanship has gone into your new Traditions muzzleloader. We work hard to provide the best value and performance possible, we back it up with a limited lifetime mechanical warranty. Should you ever experience mechanical difficulty with your new Traditions firearm, be assured that we are staffed and equipped to correct it quickly. Your satisfaction with your firearm is very important to us.
LIMITED LIFETIME MECHANICAL WARRANTY Traditions will warrant this muzzleloading firearm (or parts in a kit to be built) to be free of mechanical defects in materials or craftmanship for the life of the firearm, while in the possession of the original owner except wooden stocks. Traditions will repair or replace, at its own option, product or parts which are returned at owner’s expense to the Traditions Customer Service Department. A full explanation of the specific problem must accompany the returned item.
TABLE OF CONTENTS YOUR NEW TRADITIONS MUZZLELOADER . . . . . . . . . . . . . 1 TODAY’S MUZZLELOADING SPORT . . . . . . . . . . . . . . . . . . . . . . . 2 MUZZLELOADING ‘MUSTS’ FOR MUZZLELOADING SUCCESS . . . . . . . . . . . . . . . . . . . . . . . . 3 BEFORE YOU USE YOUR MUZZLELOADER . . . . . . . . . . . . . . . . 5 THUMB SAFETY . . . . . . . . . . . . . . . . . . . . . . . . . . . . . . . . . . . . . . . . . . 5 DISASSEMBLY FOR IN-LINE MUZZLELOADERS. . . . . . . . . . . .
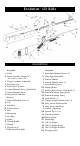
Evolution™ Premier Rifle DESCRIPTION Description A Stock B Barrel Assembly (Length 26”) .50 cal. Perc.
Evolution™ LD Rifle DESCRIPTION Description A Stock B Barrel Assembly (Length 26”) .50 cal. Perc.
Evolution™ Rifle DESCRIPTION Description A Stock B Barrel Assembly (Length 24”) .50 cal. Perc.
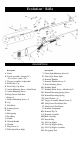
Thunderbolt™ Rifle DESCRIPTION Description A Stock (Finished) B Barrel Assembly (Length 24”) .50 cal. Perc.
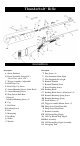
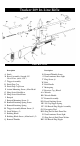
Tracker 209 In-Line Rifle DESCRIPTION Description Description A B . C D E F G H I J K L M N O P Q Stock Barrel Assembly (Length 24”) 50 cal. Perc.
YOUR MUZZLELOADING RIFLE Congratulations on your purchase of a Traditions muzzleloader. You have selected a muzzleloading firearm designed and engineered to give today’s shooters the highest performance and optimum accuracy. When given the respect and care that any firearm demands, you can expect many years of reliable service and enjoyable hunting from your new Traditions muzzleloader. A person using any firearm has elected to take on an enormous responsibility.
THE SPORT OF MUZZLELOADING More and more sportsmen have discovered the challenges and enjoyment of muzzleloading in recent years. For both hunting and target shooting, muzzleloading guns have helped a modern generation recapture and enjoy an important aspect of our nation’s sporting past. Traditions In-Line Muzzleloaders are firearms which represent the latest developments in this unique part of the shooting sports. They are manufactured to modern standards for safe and enjoyable shooting.
MUZZLELOADING ‘MUSTS’ FOR MUZZLELOADING SUCCESS 1. Read completely, fully understand and be willing to follow all instructions and warranty limitations outlined in this booklet before loading or attempting to shoot your new Traditions muzzleloader. 2. Always treat any firearm as if it is loaded. 3. Always wear proper eye and ear protection when loading or firing any firearm. 4. Don’t shoot until you are absolutely sure of your target and what is beyond it.
. Always be mindful of where the safety lever is set and routinely verify its setting. Never solely rely on any rifle’s safety. It is prudent to always treat every gun as if it were loaded and ready to fire. A firearm’s safety is a mechanical device which can fail. 15. Always disable your muzzleloader by carefully removing the percussion cap or primer and unloading the barrel when immediate shooting is not planned. 16. Never install a percussion cap or primer on the nipple before the gun is loaded.
MAKE SURE THAT THE MUZZLELOADER IS UNLOADED BEFORE PROCEEDING. To check if the muzzleloader is unloaded, remove the ramrod and place it down the barrel. The ramrod should be flush with the muzzle. If it is not, you will need to disassemble the muzzleloader and remove the obstruction before proceeding. Refer to the disassemble section. BEFORE YOU USE YOUR MUZZLELOADER, CLEAN & LUBRICATE IT! These are brief instructions on what to do before you use your muzzleloader for the first time.
gun’s trigger block mechanism. This mechanical device is designed to place your gun in a safer status. No guarantee can be made that the gun absolutely will not fire even if the safety is set on the “Safe” (S) position. Like any mechanical device, a “Safety” can sometimes fail. It can be jarred or inadvertently manipulated into an unsafe condition. Never test the safety while your rifle is loaded or at any time while it is pointed in an unsafe position.
DISASSEMBLY FOR IN-LINE MUZZLELOADERS: (Tracker 209 , Buckhunter’s & other variations) Before proceeding with disassembly and maintenance of your rifle, make certain the gun is unloaded and that the cap, or primer has been removed from the nipple. 1. Remove ramrod and make sure the muzzleloader is unloaded. 2. With safety in “fire” or “off” position, hold trigger in and push bolt handle and bolt to the forward position. Place bolt in Fig.
DISASSEMBLY FOR BOLT ACTION MUZZLELOADERS: (ThunderBolt and Evolution Rifles) Removal of Bolt from the Receiver Before proceeding with disassembly and maintenance of your rifle, make certain the gun is unloaded and that the percussion cap or primer has been removed from the nipple. a. New, out of the box, the muzzleloader comes without the bolt in the receiver. b.
1. Using a 2mm (metric) hex wrench, loosen and halfway unscrew the small set-screw located in the bolt head. It is located underneath and at the rear of the bolt. 2. Using the 209 Depriming tool or a wide Fig. 4 blade flat-headed screwdriver, unscrew the striker counterclockwise, located at the front of the bolt and remove it from the bolt body. Helpful Hint: Secure the 209 Depriming tool in a pair of vice grips and use the vice grips for more leverage when unscrewing the striker from the bolt body. Fig.
Installing the Bolt Into the Receiver Note: Before installing the bolt into the receiver, you must first install the breech plug and the nipple. See Installation instructions for both items. 1. Inspect breech area for obstructions or debris. Clean out if necessary. 2. Move safety in “Fire” (F) position. 3. Pull trigger to rear and hold. 4. While holding in trigger, slide the bolt into the rear of the receiver. IMPORTANT: Rotate & align the bolt head with the milled cutout slot in the base of the receiver.
Removal of the Nipple: 1. Make sure that the nipple is not capped or primed. 2. Remove the bolt assembly from the receiver. 3. Insert the breech plug wrench supplied with your muzzleloader through the rear of the receiver (while squeezing the trigger) and position the correct side of it over the nipple. 4. Insert the handle into the wrench and unscrew the nipple counterclockwise. Note: The breech plug and 209 adapter on the ThunderBolt rifle are one unit.
2. Wipe with a clean cotton cloth. Repeat until all residue is off. 3. Apply some Tradition’s Breech Plug grease onto the threads of the breech plug. 4. Place the breech plug in the receiver. 5. Slide the wrench onto the threads and screw it in clockwise. 6. Securely tighten the breech plug into the breech area. Installation of the Nipple: 1. Before installing a nipple, be sure to clean and lubricate the threads with Traditions Breech Plug/Nipple Grease or Wonderlube 1000 Plus.
PROPELLANTS: If you have any questions regarding powder velocities and pressures please contact the manufacturer of the propellant. 1. Black powder, Pyrodex, Pyrodex pellets or Triple 7 powder are the only safe propellants to use in this muzzleloading rifle. Maximum charges of Triple 7 should be reduced by 15%, whether measured by weight or volume. 2. The term “black powder” does not refer to any powder black in color, since modern smokeless powders are also black in color. 3.
CAUTION: Never smoke while loading, shooting or handling propellants. Always follow the manufacturer’s safety precautions as listed on the propellant container. PREPARING TO LOAD THE PROPELLANT: 1. Wear eye and ear protection. 2. Check to make sure nipple is securely tightened into breech plug. If necessary, tighten with correct size nipple wrench. 3. Make certain the gun is unloaded. a. Move the safety into the “on” or “safe” position. b.
patch in bore. Point rifle in safe direction, place cap or primer on nipple & fire two caps or primers. Remove ramrod from bore and inspect patch. Patch should have a complete circular burn in middle. This tells you that you have a clear fire channel. 7. Stand the butt of the rifle on the ground so that the muzzle is pointed up and away from you and others. Never work with your face or any part of your body over the muzzle, even when the gun is unloaded. 8. Your rifle is now ready to be loaded.
LOADING THE PROJECTILE: Note: The Evolution rifle is equipped with the Projectile Alignment System (PAS), which helps ensure correct placement of the bullet in the muzzle. See Fig. 20. Saboted Bullets: The plastic material used in our Traditions sabots is self-lubricating, therefore you need not pre-lube your bullets. 1. Insert the base of the bullet into the sabot, making certain the bullet is firmly & fully seated against the bottom of the sabot. 2. Place the assembled projectile into the muzzle. 3.
powder, particularly if the gun is subjected to jarring or sharp movement before ignition. PATCHED ROUND BALLS: 1. Lubricate a dry cloth shooting patch with Traditions Wonderlube 1000 Plus or use a pre-lubed shooting patch. 2. Center the patch over the muzzle. Caution: Never use any type of plastic patch or sabot with a round ball. 3. Place the lead ball on top of the patch. If the lead ball has a flat section or ìsprueî, place it upward. 4.
CAPPING YOUR MUZZLELOADER: There are four major ignition types in black powder shooting at this time. They are the flint, the #11 percussion cap, the musket cap and the 209 shotgun primer. The flint is used in flintlock sidelock muzzleloaders only. The #11 percussion cap has been and is still used today with many sidelock and in-line muzzleloaders. The musket cap was mainly used in sidelock muzzleloaders and became popular with in-line muzzleloaders in the 1990’s because of its’ hotter ignition.
DECAPPING YOUR MUZZLELOADER: 1. Use a De-capping tool to remove a primer or a percussion cap from the nipple. 2. Slide the tool alongside the inner part of the cap or primer closest to the nipple and push the cap or primer off the nipple. 3. A depriming tool is provided with your rifle. This is a flat piece of case-hardened metal approximately 2 1/2” long and 1/2” wide, with a forked arrangement at one end. Use the forked end of this tool to remove spent 209 primers from your rifle. See Fig. 27.
Misfire A misfire is a failure of either the cap or the main charge to ignite. This could be a very hazardous situation. Extreme caution should be exercised when dealing with a misfire. Rarely is a misfire the fault of the rifle. Generally, it can be attributed to a problem with the propellant or cap. Should your gun fail to fire for any reason, keep the muzzle pointed at your target for at least one minute with the bolt closed.
4. Insert a ramrod into the muzzle and push the load out of the rear of the barrel. Take care not to get water or powder into the trigger mechanism. 5. Clean and wipe all surfaces of loose material. 6. Remember, when the powder dries, it will again be volatile. Dispose of properly. NOTE: It is also possible to drive the projectile out the muzzle. However, an extra long bench rod or a standard ramrod with an extension will be needed to accommodate the added length of the receiver. Method 2 1.
first. After you are able to shoot at least 3 shots in the same 2” area, then adjust your sight to the center bullseye. To adjust: Move the rear sight in the direction you want the bullet to go. Note: Traditions recommends while sighting in your muzzleloader that you Fig. 28 clean the bore between each of your shots. By doing this you are starting out with a fresh, seasoned bore that will help prevent some shooting errors such as powder build up that could cause inaccuracies.
NOTE: It should never be necessary to hammer or excessively force a projectile down the bore. Projectiles should load firmly against the powder charge with a series of short push strokes. If the projectile is the proper size, unusual resistance usually indicates the need to swab the bore with a treated cleaning patch. Use bore cleaner solution if heavily contaminated. An occasional cleaning of the bore with a brass Traditions Bore Brush is advisable to remove excessive fouling build-up.
CLEANING AFTER SHOOTING CAUTION: Before cleaning, make absolutely certain the gun is unloaded and uncapped. Use the ramrod measuring method as described earlier. Clean your gun as soon as possible after your shooting session. To leave a gun uncleaned, even overnight, can result in serious and damaging corrosion. ADVICE: Take care when cleaning not to get water or solvent into the trigger assembly.
10. Lightly coat outside and inside of barrel and all other metal parts with Wonderlube 1000 plus 11. Clean all residue off inside and outside of the stock. 12. Disassemble the bolt if you have a bolt action muzzleloader. See Disassembly section. 13. Clean and then lightly oil all bolt parts or plunger parts and reassemble. 14. Reassemble the entire muzzleloader. NOTE: An extra long bench/range ramrod is necessary for this cleaning method given that it must be as long as the barrel and receiver.
with wood stocks that can be effected by moisture in the environment), the torque applied to the breech plug from installation to installation, etc. can all change the point of impact. A clean barrel bore is definitely more accurate than one with accumulated fouling. Cleaning the bore of the barrel with one or two lubricated cleaning patches, attached to the cleaning jag end of a ramrod, between shots is the single most effective thing you can do to optimize accuracy between shots.
HUNTING LOAD RECOMMENDATIONS: Caliber .45 Bullet 180 gr. saboted bullet Charge (2) 50 gr. pellets (3) 50 gr. pellets 100 gr. Pyrodex RS 150 gr. Pyrodex RS 100 gr. Triple 7 Muzzle Velocity 1950 fps 2400 fps 1900 fps 2350 fps 2100 fps .45 200 gr. saboted bullet .50 240/250 gr. saboted bullet .50 300 gr. saboted bullet (2) 50 gr. pellets (3) 50 gr. pellets 100 gr. Pyrodex RS 150 gr. Pyrodex RS 100 gr. Triple 7 (2) 50 gr. pellets (3) 50 gr. pellets 100 gr. Pyrodex RS 150 gr. Pyrodex RS 100 gr.
PREFERRED CUSTOMER WARRANTY REGISTRATION CARD Referencing the label on the end of the carton, please write in the last 5 digits located on the right half of the UPC code into the boxes below.