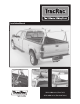
Installation Manual SKU# 21000 series (Base Rails) SKU# 22000 series (Overhead Racks)
Welcome to the world of TracRac! We’re delighted that you have chosen TracRac, the ultimate sliding truck rack system. Overview: The TracRac system consists of: • Two triple-track base rails that fit onto the side walls of your truck bed. • Two overhead racks that slide onto the base rails. • 4 sliding tiedowns for use on the crossbars • 4 cleats for the easy tiedown of cargo Installation Procedure: 1. Verify you have received all the parts. 2. Mount the base rails onto the side walls of your truck bed. 3.
TRACRAC ASSEMBLY OVERVIEW Tools Required: • 6 ft. straight edge A complete TracRac assembly comes in 2 boxes. • Tape measure • Socket wrench with 5/16” & 9/16” sockets • 9/16” open-end/box wrench • 3/16” allen wrench • 1/4” allen wrench • Torque wrench Included • Ball point allen driver Overhead Rack Assembly Box 2 Base Rail Assembly Box 1 TRACRAC BASIC UNIT: Item Part/SKU# Qty Base Rail Assembly 21000 series 1 set Overhead Rack Assembly 22000 series 1 set TracRac Inc.
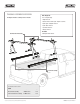
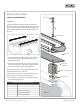
BASE RAIL ASSEMBLY 8 4 7 6 3 1 2 5 BASE RAIL ASSEMBLY: Item Description Qty 1 Brass pocket nut 4/6 2 Rubber expansion block 4/6 3 Plastic wedge/shim 2 4 Safety bolt 3/8” long 8 5 Base rail (Left & Right) 2 6 Socket head cap screw 3” long 4/6 7 Plastic access plug 30 8 Nylon washer 6 9 1/8” rubber spacer (not shown) For trucks without stake pockets. 6 � � Note: Measurements “A” and “B” must be equal 4 TracRac INSTRUCTION MANUAL TracRac Inc.
BASE RAIL INSTALLATION Trucks without bedliners Plastic cap OVERVIEW: TracRac installation is straightforward, and should take about an hour. You’ll start by mounting the base rails to the truck, ensuring that they remain parallel and in plane. Then you’ll assemble the overhead racks, sliding them onto the base rails. Socket head cap screw Plastic washer Base rail 1. Verify that you have received the correct parts, and that the base rail part # corresponds to your pickup truck make, model, and year.
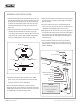
4. Line up the base rail and the plastic shim so that the holes line up – the thick side of the shim should face outwards. (Certain truck models do not require the plastic shim. See table on page 5 for details). Insert one plastic washer onto each 3/8-16 x 3” socket head cap screw. Insert the socket head cap screws through the base rail holes, through the shim and through the rubber expansion blocks, as shown below below.
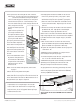
BASE RAIL INSTALLATION: For trucks without stake pockets You’ll be attaching the base rails to the side rails of the truck the old-fashioned way – by drilling 4 – 6 holes and bolting the rails in position. C-clamp base rails onto the truck - making sure the rails are in correct position for drilling. Rails must remain parallel within 1/16”. Use the holes specified for your truck and mark each center.
Plastic cap Trucks with bedliners “Over the Rail” (cont) Socket head cap screw CAUTION: All 1/4-20 x 3/8” safety locking bolts must be installed, and all knobs tightened prior to operating the vehicle on the road. Plastic washer Now you’re ready for the overhead rack assembly! For good performance and safety, periodically check that the base rails remain parallel and secure. Re-torque all fasteners to the proper specification after the first 500 miles, and every 10,000 miles thereafter.
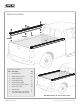
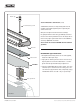
OVERHEAD RACK ASSEMBLY 10 8 7 6 5 10 10 11 13 3 13 12 11 4 2 9 1 OVERHEAD RACK ASSEMBLY: FASTENER BAG Item Description Qty 1 Rear overhead rack corner-left 1 2 Rear overhead rack corner-right 1 3 Front overhead rack corner-left 1 4 Front overhead rack corner-right 1 5 Brace, corner support 4 6 Crossbar assembly 2 7 Crossbar tiedown 4 8 Knob (crossbar tiedown) 4 9 Cleat crossbar 10 T-Bolt 3/8-16 x 1-1/8” 4, 2 16 11 Washer, 3/8” 8 12 Screw, hex cap 3/8-16 x 1-1/4
OVERHEAD RACK INSTALLATION: 1. Take the forward left and right overhead rack corner units and slide them onto the outer tracks of the base rails. (The forward units have TracRac decals on them). Slide them up against the safety locking bolts at the cab end, insert and tighten the black plastic knobs at the base of each corner unit. 2. Take the overhead rack crossbar and orient it so that the side with the flat indentation faces down.
8. Repeat steps 1 through 7 for the rear corner units. Mount the rear rack onto the inner tracks for maximum capacity and strength. CAUTION: All fasteners in overhead rack assembly must be tightened to a torque specification of (20-25 ft-lbs). 9. Slide the crossbar tiedowns onto the overhead rack crossbars. (Note: Loosen knob, then insert the T-bolt into the groove first). 10. Mount all four cleats onto the uprights using the 1/4 x 1-3/4 socket screws; two screws for each cleat. 11.
TIPS FOR CARE AND MAINTENANCE If You Plan To Remove Your Rails General Care 1. Place a thin strip of rubber tape or rubber membrane (roofer’s tape) on the underside of the plastic shim before you position the base rails on the truck. A fresh coat of wax is also recommended. This will reduce friction/chafing over time. Periodically retighten all fasteners and check the torque on the rubber expansion blocks (we recommend checking every 4 months).