
Instruction Manual


MN December22
www.tqbbrands.com.au Page 2 of 3
4. Use a water supply hose to manually fill the reservoir to the full level on the level indicator panel located at the
rear of the unit below the air inlet panels, or if overfilled drain off the excess water to the correct full level.
5. Reconnect the water supply to the float valve inlet and turn the supply on.
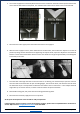
6. With the water supply turned on, water will flow from the float valve, Use the float arm adjustor to set the off
position by tilting the float downwards and tightening the adjuster knob, repeat this adjustment until the float
bottom is under water and the water flow has ceased. This will be at an angle of approximately 15 to 20 degrees
to the body of the valve.
7. Once the float valve angle has been set and the water is not flowing, we recommend you open the reservoir
drain and wait for the float valve to open and filling begins, then close the drain, and check the level at which
the water flow stops. If it stops below or above the level mark as seen in instruction 4. Then readjust the float
angle either up to increase volume, or down to reduce volume and prevent overflow.
8. Reassemble cooling pad, dust proof sheet and cooling pad fastening sheet.
9. Reconnect the electricity supply and turn to on position.
At this point the Evaporative Cooler should be ready for Operation.
If the Evaporative Cooler continues to show the Symptoms as above, please refer to a Qualified Service Technician or
contact TQB Brands via
sales@tqbbrands.com.au
or 03 9357 8440.