
User Manual


MN March22 www.tqbbrands.com.au Page 3 of 3
11. Reassemble cooling pad, dust proof sheet and cooling pad fastening sheet.
12. Fill water tank to recommended level and test unit for operation.
The Evaporative Cooler should now be ready for operation. If the Evaporative Cooler continues to show the symptoms as
described above, please refer to a Qualified Service Technician or contact TQB Brands via
sales@tqbbrands.com.au or 03 9357
8440.
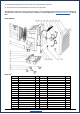
Parts Diagram
Parts List
Part #
Description
QTY
Part #
Description
QTY
1
Control Panel & Label
1
17
Front Wheel
2
2
Display Board
1
18
Drain Valve
1
3
PC Board
1
19
Pipe Clamp
3
4
Capacitor
1
20
Water Pipe
1
5
Automatic Diffuser
1
21
Fan
1
6
Cooling Casting
1
22
Fan Motor
1
7
Front Mesh
1
23
Water Distributor
1
8
Cable Reel
2
24
Fan Bracket
4
9
Water Level Displayer
1
25
Cooling Pad
1
10
Water Inlet Hole
1
26
Dust-Proof Net
1
11
Wire Ring
3
27
Cooling Pad Fasten Sheet
1
12
Electric Wire
1
28
Water Pump
1
13
Water Level Sensor Fixture
1
29
Stainless Clip
2
14
Water Level Sensor
1
30
Water Pump Platen
1
15
Water Tank
1
31
Float
1
16
Back Wheel
2
32
Remote Control
1