910100119 REV1.0.
Contents About this guide . . . . . . . . . . . . . . . . . . . . . . . . . . . . . . . . . . . . . . . . . . . . . . . . . . . i Chapter 1. Get started . . . . . . . . . . . . . . . . . . . . . . . . . . . . . . . . . . . . . . . . . . . . . 1 1. 1 1. 2 1. 3 1. 4 1. 5 Overview . . . . . . . . . . . . . . . . . . . . . . . . . . . . . . . . . . . . . . . . . . . . . . . . . . . . . . . . . . . . . . . . . . . 1 Buttons . . . . . . . . . . . . . . . . . . . . . . . . . . . . . . . . . . . . . . . . . . . .
5. 1 5. 2 5. 3 5. 4 5. 5 5. 6 Type of messages . . . . . . . . . . . . . . . . . . . . . . . . . . . . . . . . . . . . . . . . . . . . . . . . . . . . . . . . . .21 Send messages . . . . . . . . . . . . . . . . . . . . . . . . . . . . . . . . . . . . . . . . . . . . . . . . . . . . . . . . . . . .21 Reply to messages . . . . . . . . . . . . . . . . . . . . . . . . . . . . . . . . . . . . . . . . . . . . . . . . . . . . . . . . .22 Search for messages . . . . . . . . . . . . . . . . . . . . . . . . . . . .
11. 2 11. 3 Manage files . . . . . . . . . . . . . . . . . . . . . . . . . . . . . . . . . . . . . . . . . . . . . . . . . . . . . . . . . . . . . . .37 Share files . . . . . . . . . . . . . . . . . . . . . . . . . . . . . . . . . . . . . . . . . . . . . . . . . . . . . . . . . . . . . . . . .38 Chapter 12. Weather . . . . . . . . . . . . . . . . . . . . . . . . . . . . . . . . . . . . . . . . . . . . . . .39 12. 1 12. 2 Check the weather . . . . . . . . . . . . . . . . . . . . . . . . . . . . . . . . .
16. 14 Date and time . . . . . . . . . . . . . . . . . . . . . . . . . . . . . . . . . . . . . . . . . . . . . . . . . . . . . . . . . . . . .49 16. 15 Accessibility . . . . . . . . . . . . . . . . . . . . . . . . . . . . . . . . . . . . . . . . . . . . . . . . . . . . . . . . . . . . . . .50 16. 16 About phone . . . . . . . . . . . . . . . . . . . . . . . . . . . . . . . . . . . . . . . . . . . . . . . . . . . . . . . . . . . . . .51 Appendix A: Specifications. . . . . . . . . . . . . . . . . . . . . . .
About this guide This guide is a complement to Quick Start Guide. The Quick Start Guide provides instructions for quick setup, while this guide provides details of each function and shows how to configure the smart phone appropriate to your needs. When using this guide, please notice that features of the device may vary slightly depending on the model and software version you have, and on your location, language, and Internet service provider.
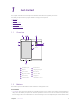
1 Get started This chapter introduces the smart phone’s hardware information and guides you how to assemble your phone when you get started on using your new phone. • Overview • Buttons • Put in the cards • Initial setup • Charge your phone 1. 1 Overview 1 2 3 9 4 5 6 10 11 7 8 1.
the screen automatically in a given period of inactivity. To adjust the time, go to Automatically lock. Settings -> Display -> • Unlock Neffos: Press the Power button to wake the screen. For additional security, you can require a pattern, PIN, password or fingerprint to unlock you phone. Go to Settings -> Fingerprint and encryption -> Screen lock to choose a safe way to unlock your phone. • Turn Neffos on: Press and hold the Power button until your phone vibrates and the screen turns on.
1. 4 Initial setup Press and hold the Power button to turn on your phone, and then follow the onscreen instructions to complete the initial setup. It is recommended to insert your SIM card before you start the initial setup. . 1. Select your language, and then tap 2. Proceed to the Set up SIM cards screen. Follow the onscreen instruction to select a SIM for cellular data, calls and text messages and then tap NEXT.
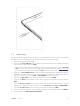
1. 5 Charge your phone Connect the device to a power outlet using the included USB cable and power adapter. 1. Connect the USB cable into the Charging port. 2. Connect the USB cable to the power adapter, then plug the power adapter into a power outlet. 3. When the battery is full, unplug the power adapter from the power outlet and remove the USB cable from your phone. Note: 1. The battery is built into the phone and is not removable. Do not attempt to remove the battery yourself. 2.
2 Basics Learn about your smart phone’s basic feature. • Touchscreen gestures • Home screen • Status icons • Quick settings panel • Notification panel • Type text • Take a screenshot • Configure your fingerprint • Change the theme • Access applications 2. 1 Touchscreen gestures Use simple touchscreen gestures to perform a variety of tasks, such as open applications, scroll through lists, and zoom images. Touch: Simply tap an item once. For example, touch to select an option or open an application.
Swipe: Place your finger on the screen, and drag your finger to the direction you want. For example, in the Notifications panel, swipe left or right on a notification to dismiss it. Swipe vertically or horizontally to go to other home screens, scroll through a document, and more. Drag: Touch and hold an item and then move it to another position. For example, you can rearrange applications and widgets on the Home screen. Zoom out: Pinch two fingers together on the screen.
Zoom in: Spread two fingers apart on the screen. For example, pinch two fingers out to zoom on a picture or a web page. 2. 2 Home screen Your home screens are where you can find your favorite widgets and all your applications. Status bar Widget APP screen indicator APP shortcuts Chapter 2 .
Status bar: Displays notifications and status icons. Widget: Self-contained applications that run on the Home screen (not shortcuts). APP screen indicator: Indicates which screen is displayed. APP shortcuts: Shortcuts to your favorite applications. Organize applications and widgets on the Home screen On the Home screen, pinch two fingers together or touch and hold a blank area on the screen to access the Home screen editor.
Headset inserted Wi-Fi Hotspot No SIM card installed Screenshots Mute mode enabled Airplane mode enabled Bluetooth enabled Download status/Bluetooth share: received files Uploading data/Bluetooth share: sent files Alarms enabled Call in progress Missed calls New messages Do not disturb Battery saver 2. 4 Quick settings panel Swipe down from the top of any screen twice to open the Quick settings panel. Note: On the Lock screen, swipe only once to open the Quick settings panel.
5. Brightness slider: Use this slider to adjust the brightness of the screen. 6. Bluetooth: Tap to enable Bluetooth. 7. Mobile data: Tap to enable mobile data. 8. Rotation: Tap to open auto-ratate which can switch the touchscreen from portrait to landscape when you rotate your phone. 9. Location: Tap to enable location service. 10. Battery saver: Tap to enable battery saver. 11. Do not disturb: Tap to silence your phone. 12. Edit: Tap to enter the edit page.
Go to Settings -> Notification manager -> -> Notifications, you can choose whether to show all notification content, or whether to hide sensitive content, or to do not show notifications at all when the device is locked. 2. 6 Type text Enter text Use Android input method to enter text. 1. Tap , or touch and slide to a letter to type uppercase. Double-tap 2. Enter numbers, punctuations and symbols. 3. Enter a comma. for caps lock. Tap and hold to open the input options menu.
2. Select an input method you need. 2. 7 Take a screenshot Press the Power and Volume down buttons at the same time to take a screenshot. 2. 8 Configure your fingerprint Use the fingerprint sensor to unlock the screen, take photos and unlock apps. Add a fingerprint for the first time For added security and to ensure that you can still access your data if your phone fails to recognize your fingerprint, you will need to set a backup screen lock method when configuring fingerprint unlock.
2. 9 Change the theme Personalize your phone’s Home screen using a wide range of themes and wallpapers. 1. On the Home screem, tap 2. Tap style. Themes, select a theme, and then tap APPLY. and you can select the theme packs, wallpapers, icons, sounds, fonts, boot animations and system 2. 10 Access applications Launch and switch between applications • From the Home screen: touch an icon to launch the corresponding application. • From the Locked screen: Swipe up to launch the camera application.
3 Connection Share your phone data with others by various kinds of connections. • Connect to Internet • Connect to computer • Bluetooth • Share your mobile data with other devices 3. 1 Connect to Internet Connect to the Internet using Wi-Fi or mobile data to surf the web, play games, and use instant messaging applications. Connect to a WLAN network If appears in the status bar, you are connected to a Wi-Fi network. Neffos reconnects anytime you return to the same location. 1.
1. Swipe down from the status bar (except for the Lock screen) twice to open the Quick settings panel. 2. Tap and hold Blutooth to enter the Bluetooth settings. Tap the switch to turn it on. Your phone will automatically list available devices. If the device you want to pair with is not displayed, check that the device is discoverable. 3. Select the device you want to pair with and follow the onscreen instructions. (You can also turn Bluetooth on in Settings -> Bluetooth).
2. Tap the switch to turn it on. After enabling your personal Wi-Fi hotspot, your phone will display icon 3. and in the status bar. Tap Set up WLAN hotspot to set the hotspot name, security and password, and then tap SAVE. • Change the hotspot name: The Network name is the hotspot name. By default, this is the name of your phone model. You can manually change the name to something that is easier to remember. • Change the security setting: Tap Security to configure security setting.
4 Calls Make calls with your phone to contact one quickly. • Make a call • Answer or reject a call • Options during a call • Call log • Call settings 4. 1 Make a call Dial directly from the dialer 1. On the Home screen, tap Phone -> 2. Enter a number and tap to dial. If you have inserted two SIM cards, select SIM1 or SIM2 to dial. . Dial a recent number from the Dial All incoming , outgoing and missed call are in the Dial. Phone -> Dial, a list of recent calls will be displayed. 1.
• Drag right to answer the call. • Drag left to reject the call. • Touch to reject the call and send SMS. When the screen is unlocked: • Touch to answer the call. • Touch to reject the call. • Touch to reject the call and send SMS. Note: 1. When a call comes in, you can press the Volume button to mute the ringtone. 2. Go to 4. 3 Phone -> -> Settings -> Quick responses to edit the predefined text messages.
1. Mute the call. 2. Start a third-party call. 3. Place the current call on hold. 4. Enable hands-free mode. 5. Make notes during the call. 6. Record the call. (In some countries, recording during the call is illegal, so their phone may not have this feature.) 7. Open the dialer. 8. End the call. Hide the in-call menu: Touch the Home button or Back button. To return to the in-call menu, slide down from the status bar to open the Notification panel and tap Ongoing call.
2. Tap Create new contact, fill in the information, and then tap . Clear the call log • Clear one call history: Tap • Clear the whole call log: Tap 4. 5 Go to next to the number you want to remove and then tap -> Call History -> . -> Clear call history. Call settings Phone -> -> Settings to configure the following call settings. • Display options: Choose the sort order and name format for your contacts.
5 Messages Use Messages to keep in touch with your friends. • Type of messages • Send messages • Reply to messages • Search for messages • Manage your messages • Message settings 5. 1 Type of messages Text Messages (SMS) The Short Messaging Service (SMS) lets you send and receive text messages to and from other mobile phones.
2. Add attachment 3. Text field 4. Swipe left or right to select attachment type 5. Choose recipients 6. Send out messages 5. 3 Reply to messages 1. On the Home screen, tap 2. In the list of message threads, tap a contact name or phone number to view your conversations. 3. Select the text field and enter your message, and then tap Messages. . Note: New messages will be displayed in the Notification panel. You can also touch it to compose a reply. 5.
• Outgoing message sounds: Enable sounds when sending out messages. • Notifications: Enable notifications when you receive messages. • Vibrate: Make the phone vibrate when new message comes. • Cell broadcast: Tap Chapter 5 . Messages -> Settings to configure cell broadcast messages settings.
6 Music and video Use Music to enjoy music stored on iPhone as well as music streamed over the Internet. • Listen to music • Playback screen • Play a video 6. 1 Listen to music On the Home screen, tap Music -> Songs and tap the song you want to play. Add songs to your phone Before you can listen to your music, you need to copy your songs onto your phone. To add songs to your phone, you can: • Download songs from the Internet. • Copy songs from your computer using the USB cable.
1. Playlist. 2. Play the previous song or go back to the beginning. 3. Pause the song. 4. Add song to favorites. 5. Change playback mode. 6. Play the next song. 7. Menu. 8. Random mode. Use your phone during playback screen When a song is playing, touch the Home button to exit the music playback screen without stopping the song. To return to the music playback screen, open the notification panel and touch the song that is playing.
• Swipe left or right to rewind or fast-forward the video. • Swipe up or down on the left side of the screen to adjust the screen brightness. • Swipe up or down on the right side of the screen to adjust the volume. Chapter 6 .
7 Camera and gallery Use multiple features of your camera to capture your precious moments. • Camera at a glance • Take a photo • Record a video • Shooting modes • Camera and video settings • Gallery 7. 1 Camera at a glance Launch your camera • On the Home screen: Tap Camera. • On the Lock screen: Just swipe up. Camera home screen 1. Flash mode. 2. HDR mode. 3. Beauty mode. For more information, see Shooting modes. 4. Switch between the back camera and front camera. 5. Take a timed photo.
7. Swipe right on the screen to change shooting modes or configure the camera settings. For more information, see Shooting modes and Camera and video settings. 8. View images or videos you have taken. 9. Take a photo. For more information, see Take a photo. 10. Night mode. For more information, see Shooting modes. 11. Swipe left on the screen to apply a filter. 12. Record a video. For more information, see Record a video. 7. 2 Take a photo 1.
2) Tap to start a video recording. Touch the screen to focus on an object or area during recording. 3) Tap to end the recording. Time-lapse: Make an accelerated video of a slow-changing scene. For example, you can record the opening of a flower or the movement of clouds. 1) Tap Camera, swipe right on the screen and choose TIME-LAPSE. (You can also use Time-lapse to switch to the front camera.) mode for the front camera. Just tap 2) Tap to start a video recording.
• Photos and videos synced from your computer. • Photos and videos saved from messages, emails, or websites, as well as screenshots. View photos in chronological order: On the Home screen, tap videos are automatically displayed in chronological order. Gallery, go to the Photos tab. Photos and View photos by album: Go to the Albums tab to view photos and videos sort by albums. Photos and videos are automatically added to the default folders, such as Burst, Screenshot, Panorama, Selfie, Video and so on.
8 Calendar Use Calendar to help you plan your daily schedule. • Use the calendar • Calendar settings 8. 1 Use the calendar View the calendar 1. On the Home screen, tap 2. to select Year, Month, Day or Agenda to zoom in or out your calendar. In Day view, pinch to zoom Tap in or out. Calendar. Create an event 1. On the Home screen, tap 2. Tap 3. Follow the onscreen instructions to fill in the event details and then tap Calendar. to creat an event. when finished.
• Home time zone: Tap to set the home time zone. Before setting this, turn on the Use home time zone switch. Chapter 8 .
9 Clock In the Clock application, you can add alarms, view world times, use the stopwatch and timer features. • Alarm • Worldclock • Stopwatch • Timer 9. 1 Alarm Clock -> On the Home screen, tap Alarm, you can: • Create an alarm: 1) Tap , choose a time for the alarm. 2) Configure the alarm settings and tap to save. • Enable or disable an alarm: Tap the switch next to the alarm to enable or disable the alarm.
Clock -> 1. On the Home screen, tap 2. Turn the wheel to set the countdown time and then tap When the timer is counting, tap count down. 3. Timer. to start the timer. to pause the countdown. Tap to continue or tap to reset the When the timer goes off, tap OK on the pop-up promts to silence the ringtone. Chapter 9 .
10 Browser Use your phone browser to surf the Internet and find out all that you are curious about. • Go to a webpage • Browser tabs • Browser settings 10. 1 Go to a webpage View a webpage 1. On the Home screen, tap address you want to visit. 2. Tap Chrome, then tap the address bar on top of the page and enter the web . Do more options about the web page Tap and choose the options that you want to configure. • New tab: Open a new tab. • New incognito tab: Open a new incognito tab.
10. 2 Browser tabs You can view multiple pages simultaneously using tabs. Tap the icon and all the pages will be displayed. The number on the icon means the current number of the web pages. Open a tab On the Home screen, tap Chrome -> -> New tab. Close a tab and choose the tab you want to close. 1. Tap the icon 2. Drag the tab left or right to close the tab. (You can also tap to close the tab.) 10. 3 Browser settings Go to Chrome -> -> Settings to configure the browser settings.
11 File Manager Access files stored on your device (including AUDIO, VIDEO IMAGE, DOCUMENT, COMPRESS and APP). • View files • Manage files • Share files 11. 1 View files On the Home screen, tap File Manager. Files are organized into six categories (AUDIO, VIDEO, IMAGE, DOCUMENT, COMPRESS, APP). Tap a category to view the relevant files. Search files Use the search feature to find files quickly. Go to bar. File Manager -> , enter the file name or keywords.
Note: When you touch and hold a folder or file, you can select multiple folders and files at a time. 11. 3 Share files Files can be shared and managed on mobile phones and computers connected to the same local area network. Before sharing files, make sure that your computer supports the network neighborhood feature. 1. Connect the computer and your phone to the same Wi-Fi network. For more information on connecting your phone to a Wi-Fi network, see Connect to a WLAN network. 2. On your phone, go to 3.
12 Weather Use Weather to check the current weather and multi-day forecast for your location and many other cities around the world. • Check the weather • Weather settings 12. 1 Check the weather Add a city Add multiple cities to the weather application so that you can keep track of the weather in cities of interest to you. 1. On the Home screen, tap 2. Enter a city name in the City field and a list of cities will be displayed on the screen.
13 Notes Use Notes to record important information to save and view at a later time. • Compose a note • Note options 13. 1 Compose a note Notes -> 1. On the Home screen, tap 2. When finishing composing, tap and begin composing your new note. to save the note. 13. 2 Note options Edit a note 1. • Add pictures: Tap to select a picture from your gallery or tap • Add checklists: Tap 2. Notes, select the note you want to edit and tap the edit area to start editing.
14 GoogleTM Enjoy the applications from Google. GoogleTM Google indexes billions of web pages so that you can search for the information you desire through the use of keywords and operators. GmailTM Gmail, a free webmail service provided by Google. Google MapsTM Google Maps helps you find your current location, get directions, and other location-based information. To use Maps, you should enable location services first. YouTubeTM Use YouTube to share and view videos.
15 Tools Use Tools to enjoy more features of your phone. • Sound Recorder • FM Radio • Calculator • Downloads • Contacts • Feedback • SIM Toolkit • Compass 15. 1 Sound Recorder You can use the Sound Recorder application to record sound in a variety of different scenarios, such as meetings, interviews, or your own voice. Make a record 1. On the Home screen, tap Tools -> 2. Tap to start recording.
15. 3 Calculator 1. On the Home screen, tap Tools -> Calculator. Rotate the screen orientation to switch between the standard and scientific calculators. (Ensure that you have turn on the Auto-rotate feature on the Quick settings panel before you want to switch between the standard and scientific calculator.) 2. Tap numbers and use the arithmetic feature to complete an operation. 15. 4 Downloads On the Home screen, tap Tools -> Downloads to view the downloaded and downloading information. 15.
1) Tap Export from storage device. • Export contacts from a SIM card 1) Tap Export to SIM1 or Export to SIM2. Manage contacts After creating a contact, you can edit their contact information at any time. This includes adding or deleting default information such as phone numbers or email addresses. You can also choose a custom ringtone or add more options, such as a birthday, nickname, or photo. Contacts and then tap the contact you want to edit. 1. Go to 2. and start editing.
16 Settings This chapter contains the following sections. • SIM cards • Airplane mode • Display • Sounds and vibration • Storage • Battery • Apps • Float button • Location • Accounts • Language and input • Backup and reset • System updates • Date and time • Accessibility • About phone 16. 1 SIM cards Dual SIM settings When two SIM cards are inserted, only one SIM card can be set as the 4G/3G/2G SIM. The other SIM card slot only supports 2G networks.
Note: 1. You can configure whether you want to select a SIM card manually or use the default SIM card each time you make a call. If you choose to use the default SIM card, your phone will use that SIM card for all outgoing calls. 16. 2 Airplane mode Wireless devices may interfere with an airplane’s flight system. Power off your phone or switch to airplane mode when you are on a flight. After you enable airplane mode, all of your phone’s network features will be disabled.
• Volume: Adjust the ringtone, media and alarm volume. • Vibrate: If Also vibrate for calls is enabled, your phone will vibrate when receiving incoming calls. If Vibrate on silent is enabled, your phone will vibrate without sounds. • Ringtones & notification tones: Select ringtone for SIM1 and SIM2. Choose a preset ringtone as the notification tone for messages, emails and other notifications.
• Tap to lock the screen. • Tap to collapse the menu. 16. 9 Location Enable location-based services to ensure that map, navigation, and weather applications can access your location information. Settings -> Location. 1. Go to 2. Tap the switch to enable the location services. 3. Tap Mode to select the location mode. • High accuracy: Use GPS, WLAN, Bluetooth, or cellular networks to determine location. Enable this option for highly accurate positioning.
2. Tap Language and select the desired language from the list. 16. 12 Backup and reset Backups help ensure that you never lose your data. You can back up app data, WLAN passwords and other settings to Google servers. Back up your data Settings -> Backup & reset -> Backup and restore -> Back up my data. 1. Go to 2. Tap Back up my data, turn the switch on. 3.
• Week starts on: Choose the day a week starts on. 16. 15 Accessibility Accessibility features make it easier for users with impaired vision or hearing to use their phone. TalkBack TalkBack is an accessibility feature designed for visually impaired users. It provides audible prompts to help you operate your phone. Once it is enabled, your phone will issue audible prompts for all content that you touch, select, or enable. Please enable with caution.
2 ) Adjust the zoom level: Pinch two or more fingers together or spread them apart. To zoom in, spread your fingers apart. Pinch your fingers together to zoom back out. • Zoom in temporarily: Touch the screen three times in quick succession and hold your finger on the screen. Keep your finger on the screen and swipe to browse a magnified area. Release your finger to zoom back out. Use the Power button to end a call 1. Go to 2. Turn on the Power button ends a call switch.
Appendix A: Specifications Specifications Size and Weight Color Display CPU Memory Memory Slot Height: 142.6mm Width: 71.2mm Depth: 8.5mm Cloudy Grey/Sunrise Gold 5inches,HD (1280 x 720) 293.7PPI IPS MediaTek MT6750 4*Cortex-A53 1.5GHz + 4*Cortex-A53 1.0GHz ARM mali-T860MP2 520MHz ROM: 16 GB RAM: 2 GB MicroSD card (up to 128 GB) Camera Front 5 Mega-pixel Rear 13 Mega-pixel, PDAF Network LTE FDD Cat4 (up to 150Mbps DL / 50Mbps UL) HSPA+ (up to 21Mbps DL / 5.76Mbps UL) DC-HSPA+ (up to 42Mbps DL / 5.
Specifications Network Standard Navigation LTE/WCDMA/GSM TP904A: FDD-LTE:Band1/3/5/7/8/20 WCDMA: Band 1/5/8 GSM: Band 2/3/5/8 TP904C: GSM: band (2/3/5) WCDMA: band (2/4/5) LTE: band(2/4/7/28A&B) GPS/GLONASS/GALILEO Cloud Service Supported Operation System Android 7.
Appendix B: Technical Support Contact our technical support if you have any questions related to this product. Countries/Regions Tel: +86 755 26504400 (English Service) Fee: Depending on rate of different carriers, IDD. E-mail: support@neffos.com(English Service) Service Time: 24 hours a day, 7 days a week. Global Europe Middle East& Africa Support Germany Tel: +86 755/ 26504400 (englischsprachig) Fee: abhängig vom jeweiligen Telefonanbieter E-mail: support@neffos.
Countries/Regions Support India Toll Free:1800 2094 168 E-mail:support.in@neffos.com Service Time:10:00AM to 6:00PM, Monday to Saturday. Indonesia Local No.: (+62) 021 63861936 E-mail: support.id@neffos.com Service Time: 09:00AM to 12:00AM & 01:00PM to 06:00PM, Monday to Friday. Malaysia Tel: + 60 (3) 2141 4358 (Mon-Sun, 10.30am-8.00pm) E-mail: support.my@neffos.com Service Time: 24 hours a day, 7 days a week Singapore Local No.: +65 62840493 E-mail: support.sg@neffos.
Appendix C: Explanation of the symbols on the product label The meaning of symbols on the product label is explained below. Symbol Explanation RECYCLING This product bears the selective sorting symbol for Waste electrical and electronic equipment (WEEE). This means that this product must be handled pursuant to European directive 2012/19/ EU in order to be recycled or dismantled to minimize its impact on the environment.
COPYRIGHT & TRADEMARKS Specifications are subject to change without notice. is a registered trademark of TP-LINK TECHNOLOGIES CO., LTD. is a registered trademark of Neffos Limited. Other brands and product names are trademarks or registered trademarks of their respective holders. No part of the specifications may be reproduced in any form or by any means or used to make any derivative such as translation, transformation, or adaptation without permission from TP-LINK TECHNOLOGIES CO., LTD.
Продукт сертифіковано згідно с правилами системи УкрСЕПРО на відповідність вимогам нормативних документів та вимогам, що передбачені чинними законодавчими актами України. Personal information and data security The use of some functions or third-party applications on your device could result in your personal information and data being lost or becoming accessible to others. Several measures are recommended to help you protect personal and confidential information.
Third-party software and applications services may be interrupted or terminated at any time, and Neffos does not guarantee the availability of any content or service. Third-party service providers provide content and services through network or transmission tools outside of the control of Neffos.
• If you use medical equipment, contact the equipment manufacturer before using your device to determine whether or not the equipment will be affected by radio frequencies emitted by the device. • Do not use your device near devices or apparatuses that emit radio frequencies, such as sound systems or radio towers Radio frequencies may cause your device to malfunction. • Do not use your device near devices or apparatuses that emit radio frequencies, such as sound systems or radio towers.
• Prevent the multipurpose jack and the small end of the charger from contact with conductive materials, such as liquids, dust, metal powders, and pencil leads. Conductive materials may cause a short circuit or corrosion of the terminals, which may result in an explosion or fire. • Stop using your device or applications for a while if the device is overheated.
Battery safety • Do not connect battery poles with conductors, such as keys, jewelry, or other metal materials. Doing so may short-circuit the battery and cause injuries or burns. • Keep the battery away from excessive heat and direct sunlight. Do not place it on or in heating devices, such as microwave ovens, stoves, or radiators. Batteries may explode if overheated. • Do not attempt to modify or remanufacture the battery, insert foreign objects into it, or immerse or expose it to water or other liquids.
• Do not store your device with metal objects, such as coins, keys, and necklaces. Your device may be scratched or may malfunction. If the battery terminals come into contact with metal objects, this may cause a fire. Emergency calls The availability of emergency calls is subject to your cellular network quality, service provider policy, and local laws and regulations. Never rely solely on your device for critical communications like medical emergencies.
Statement Hereby, Neffos Limited declares that this device is in compliance with the essential requirements and other relevant provisions of Directive 2014/53/EU. For the declaration of conformity, visit the web site www.neffos.com. The following marking is included in the product: This device may be operated in all member states of the EU. Observe national and local regulations where the device is used. This device may be restricted for use, depending on the local network.