
User's Manual Part 1
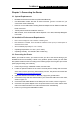
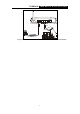
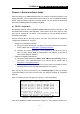
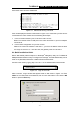
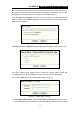
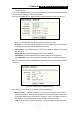
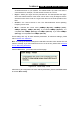

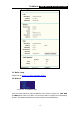
Table Of Contents
- TL-WR641G User Guide.doc
- ADP308.tmp
- Package contents
- Chapter 1: About this Guide
- Chapter 2: Introduction
- Chapter 3: Connecting the Router
- Chapter 4: Quick Installation Guide
- Chapter 5: Configuring the Router
- Appendix A: FAQ
- Appendix B: Configuring the PCs
- Appendix C: Specifications
- Appendix D: Glossary
- Appendix E: Contact Information
- ADP308.tmp
- unprotected-TL-WR642G User Guide.pdf
- TL-WR642G User guide.doc
- ADP1B5.tmp
- Package contents
- Chapter 1: About this Guide
- Chapter 2: Introduction
- Chapter 3: Connecting the Router
- Chapter 4: Quick Installation Guide
- Chapter 5: Configuring the Router
- Appendix A: FAQ
- Appendix B: Configuring the PCs
- Appendix C: Specifications
- Appendix D: Glossary
- Appendix E: Contact Information
- ADP1B5.tmp
- TL-WR642G User guide.doc

TL-WR641G 108M Wireless Router User Guide
- 9 -
PC and the router has been established.
Figure 4-2 Failed result of Ping command
If the result displayed is similar to that shown in figure 4-2, it means that your PC has not
connected to the router. Please check it following these steps:
1. Is the connection between your PC and the router correct?
Note: The Link/Act LEDs of LAN port on the router and LEDs on your PC's adapter
should be lit.
2. Is the TCP/IP configuration for your PC correct?
Note: If the router's IP address is 192.168.1.1, your PC's IP address must be within
the range of 192.168.1.2 ~ 192.168.1.254, the gateway must be 192.168.1.1
4.2 Quick Installation Guide
With a Web-based (Internet Explorer or Netscape
®
Navigator) utility, the TL-WR541G
54Mbps Wireless Router is easy to configure and manage. The Web-based utility can be
used on any Windows, Macintosh or UNIX OS with a web browser.
Connect to the router by typing http://192.168.1.1 in the address field of web browser.
Figure 4-3 Login to the router
After a moment, a login window will appear similar to that shown in Figure 4-4. Enter
admin for the User Name and Password, both in lower case letters. Then click the OK
button or press the Enter key.
Figure 4-4 Login Windows