
User's Manual
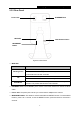
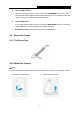


Table Of Contents
- Chapter 1 About this Guide
- Chapter 2 Introduction
- Chapter 3 Managing the Camera
- 3.1 Login
- 3.2 Live View
- 3.3 Basic
- 3.4 Advanced
- 3.4.1 Advanced → Status
- 3.4.2 Advanced → Network
- 3.4.3 Advanced → Wireless Connection
- 3.4.4 Advanced → Wireless Extender
- 3.4.5 Advanced → Cloud Setting
- 3.4.6 Advanced → DDNS
- 3.4.7 Advanced → Video
- 3.4.8 Advanced → Motion Detection
- 3.4.9 Advanced → Sound Detection
- 3.4.10 Advanced → Notification Delivery
- 3.4.11 Advanced → LED
- 3.5 System

NC250
HD Day/Night Cloud Camera, 300Mbps Wi-Fi
Click to choose a camera
working mode.
You can set the camera working mode to Auto
( ), Day ( ), or Night ( ).
Drag the slider to adjust
the size of the current
image.
The maximum zoom ratio is 4 times.
Mute off. You can hear the
current sound by the
camera.
Click and it will become .
Mute on. The current
sound by the camera is
turned off.
Click and it will become .
Drag the slider to adjust
the sound volume.
Y
ou can adjust the sound volume only with mute
off .
Click to enlarge the
current image
to full
screen display.
Press “ESC” key to return to the original screen
display.
Brightness: Drag the slider to adjust the brightness level of
camera. Large value will brighten the current displayed screen.
Contrast: Drag the
slider to adjust the contrast level of the camera.
Large value will contrast the current displayed screen heavily.
Saturation: Drag the
slider to adjust the saturation level of the
camera. Large value will saturate the current displayed screen to be more colorful.
Preset: Click the Preset button to restore to factory image settings.
3.3 Basic
Click the Basic menu to display the submenus including Status, Network, Wireless Connection,
Cloud Setting, and LED.
10