
User's Manual
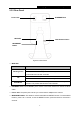
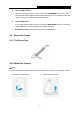


Table Of Contents
- Chapter 1 About this Guide
- Chapter 2 Introduction
- Chapter 3 Managing the Camera
- 3.1 Login
- 3.2 Live View
- 3.3 Basic
- 3.4 Advanced
- 3.4.1 Advanced → Status
- 3.4.2 Advanced → Network
- 3.4.3 Advanced → Wireless Connection
- 3.4.4 Advanced → Wireless Extender
- 3.4.5 Advanced → Cloud Setting
- 3.4.6 Advanced → DDNS
- 3.4.7 Advanced → Video
- 3.4.8 Advanced → Motion Detection
- 3.4.9 Advanced → Sound Detection
- 3.4.10 Advanced → Notification Delivery
- 3.4.11 Advanced → LED
- 3.5 System

NC250
HD Day/Night Cloud Camera, 300Mbps Wi-Fi
Used as RESET button:
With the camera powered on, press and hold the WPS/RESET button (more than 5
seconds) until both the System LED and WPS LED turn off. Then release the button and
wait the camera to reset to its factory default settings.
Used as WPS button:
If your router supports WPS, then you can press the WPS/RESET button for 1 second to
quickly establish a connection between the camera and router.
Heat Emission Holes: These holes are used for heat dissipation.
2.4 Mount the Camera
2.4.1 The Screw Size
2.4.2 Mount the Camera
Note:
If you use the camera wirelessly, mount the camera within the coverage of your wireless network.
1. Unscrew the camera head.
2. Remove the base cover.
5