
User's Manual
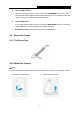


Table Of Contents
- Chapter 1 About this Guide
- Chapter 2 Introduction
- Chapter 3 Managing the Camera
- 3.1 Login
- 3.2 Live View
- 3.3 Basic
- 3.4 Advanced
- 3.4.1 Advanced → Status
- 3.4.2 Advanced → Network
- 3.4.3 Advanced → Wireless Connection
- 3.4.4 Advanced → Wireless Extender
- 3.4.5 Advanced → Cloud Setting
- 3.4.6 Advanced → DDNS
- 3.4.7 Advanced → Video
- 3.4.8 Advanced → Motion Detection
- 3.4.9 Advanced → Sound Detection
- 3.4.10 Advanced → Notification Delivery
- 3.4.11 Advanced → LED
- 3.5 System

NC250
HD Day/Night Cloud Camera, 300Mbps Wi-Fi
2.3.2 Rear Panel
Figure 2-2 Rear Panel
WPS LED:
Status Indication
Flashing Green
The camera starts booting up.
The camera is connecting to a network by WPS function. This
process will last in the first 2 minutes.
Off
The camera has boot up.
The camera failed to be added to a network by WPS function.
Solid Green
The camera has been successfully added to a network by WPS
function. This process will last in the first 2 minutes.
ETHERNET Port: The ETHERNET port is used to connect the camera to a network via RJ45
cable.
Power Jack: The power jack is where you connect the AC adapter to the camera.
WPS/RESET Button: This button is used for both WPS and RESET function. To use the WPS
function, press it for 1 second; to use the RESET function, press and hold for more than 5
seconds.
ETHERNET Port
WPS LED
Power Jack
WPS/RESET
Button
Heat Emission Holes
4