
User's Manual


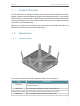
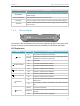

Table Of Contents
- About This Guide
- Get to Know About Your Router
- Connect the Hardware
- Log In to Your Router
- Set Up Internet Connection
- TP-Link Cloud Service
- Guest Network
- USB Settings
- HomeCare – Parental Controls, QoS, Antivirus
- Network Security
- NAT Forwarding
- VPN Server
- Customize Your Network Settings
- 12. 1. Change the LAN Settings
- 12. 2. Set Up Link Aggregation
- 12. 3. Configure to Support IPTV Service
- 12. 4. Specify DHCP Server Settings
- 12. 5. Set Up a Dynamic DNS Service Account
- 12. 6. Create Static Routes
- 12. 7. Specify Wireless Settings
- 12. 8. Use WPS for Wireless Connection
- 12. 9. Schedule Your Wireless Function
- Manage the Router
- 13. 1. Set Up System Time
- 13. 2. Control LEDs
- 13. 3. Test the Network Connectivity
- 13. 4. Test Your Internet Speed
- 13. 5. Upgrade the Firmware
- 13. 6. Backup and Restore Configuration Settings
- 13. 7. Change the Administrator Account
- 13. 8. Password Recovery
- 13. 9. Local Management
- 13. 10. Remote Management
- 13. 11. System Log
- 13. 12. Monitor the Internet Traffic Statistics
- FAQ

5
Chapter 1
Get to Know About Your Router
Name Status Indication
(WPS)
On/Off
This light remains on for 5 minutes when a WPS connection is
established, then turns off.
Flashing WPS connection is in progress. This may take up to 2 minutes.
(USB)
On The inserted USB device is ready to use.
Flashing A USB device is being identified.
Off No device is plugged into the USB port.
Button Explanation
Item Description
(Wi-Fi Button)
Press and hold the WiFi button for about 2 seconds to turn on or off the
wireless function of your router.
(WPS Button)
Press this WPS button to enable the WPS function.
(LED Button)
Press the LED button for about 1 second to turn on or off the LEDs of your
router.