
User's Manual

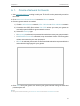
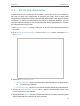
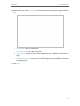


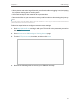
Table Of Contents
- About This Guide
- Get to Know About Your Router
- Connect the Hardware
- Log In to Your Router
- Set Up Internet Connection
- TP-Link Cloud Service
- Guest Network
- USB Settings
- HomeCare – Parental Controls, QoS, Antivirus
- Network Security
- NAT Forwarding
- VPN Server
- Customize Your Network Settings
- 12. 1. Change the LAN Settings
- 12. 2. Set Up Link Aggregation
- 12. 3. Configure to Support IPTV Service
- 12. 4. Specify DHCP Server Settings
- 12. 5. Set Up a Dynamic DNS Service Account
- 12. 6. Create Static Routes
- 12. 7. Specify Wireless Settings
- 12. 8. Use WPS for Wireless Connection
- 12. 9. Schedule Your Wireless Function
- Manage the Router
- 13. 1. Set Up System Time
- 13. 2. Control LEDs
- 13. 3. Test the Network Connectivity
- 13. 4. Test Your Internet Speed
- 13. 5. Upgrade the Firmware
- 13. 6. Backup and Restore Configuration Settings
- 13. 7. Change the Administrator Account
- 13. 8. Password Recovery
- 13. 9. Local Management
- 13. 10. Remote Management
- 13. 11. System Log
- 13. 12. Monitor the Internet Traffic Statistics
- FAQ

30
Chapter 6
Guest Network
6. 2. Set Portal Authentication
Imagine that you run a small shop and provide a guest network for your customers.
You want to seize every opportunity to promote your shop, which makes portal
authentication an excellent choice. Customers will be directed to a web page for access
verification, on which your personalized promotion is displayed. Moreover, you can
specify a web link so that the newly connected guest will be redirected to, for example,
the official website of your shop.
1. Visit http://tplinkwifi.net, and log in with your TP-Link ID or the password you set for
the router.
2. Go to Advanced > Guest Network. Focus on the Wireless section, and select Portal
for Security.
3. Select the Authentication Type.
• Simple Password – Specify a password for authentication (8-16 alphanumeric
or “_” characters are allowed).
• No Authentication – Guests can access the network without any authentication.
4. Specify the Authentication Timeout. When a guest’s authentication expires, they
have to reconnect to the network.
5. (Optional) Enable Redirect and enter the desired web link. The newly connected guest
will be redirected to the website you have specified.