
User's Manual


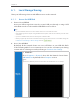


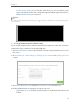

Table Of Contents
- 1910011594_AD7200_UG_REV1.0.0-160426.pdf
- About This Guide
- Get to Know About Your Router
- Connect the Hardware
- Log into Your Router
- Set Up Internet Connection
- Guest Network
- USB Application
- Parental Controls
- QoS
- Network Security
- NAT Forwarding
- VPN Server
- Customize Your Network Settings
- Manage the Router
- 13. 1. Set Up System Time
- 13. 2. Test the Network Connectivity
- 13. 3. Upgrade the Firmware
- 13. 4. Backup and Restore Configuration Settings
- 13. 5. Change the Administrator Account
- 13. 6. Password Recovery
- 13. 7. Local Management
- 13. 8. Remote Management
- 13. 9. System Log
- 13. 10. Monitor the Internet Traffic Statistics
- 13. 11. Control LEDs
- FAQ
- Specifications
- AD7200_警语

28
Chapter 5
5. 1. Create Guest Network
1. Visit http://tplinkwifi.net, and log in with the username and password you set for the
router.
2. Go to Advanced > Guest Network.
3. Create a 2.4GHz or 5GHz guest network according to your needs.
1 ) Enable Wireless Network 2.4GHz or Wireless Network 5GHz.
2 ) Set an easy-to-identify SSID. Don‘t select Hide SSID unless you want your guests
and other people to manually input this SSID for Wi-Fi access.
3 ) Set Security to WPA/WPA2 Personal, keep the default Version and Encryption
values, and set an easy-to-remember Password.
4. Click Save. Now your guests can access your guest network using the SSID and
password you set!
Tips:
To view guest network information, go to Advanced > Status and find the Guest Network section.
5. 2. Customize Guest Network Options
1. Visit http://tplinkwifi.net, and log in with the username and password you set for the
router.
2. Go to Advanced > Guest Network.
3. Customize guest network options according to your needs.