
User's Manual


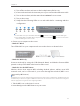
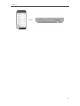

Table Of Contents
- 1910011594_AD7200_UG_REV1.0.0-160426.pdf
- About This Guide
- Get to Know About Your Router
- Connect the Hardware
- Log into Your Router
- Set Up Internet Connection
- Guest Network
- USB Application
- Parental Controls
- QoS
- Network Security
- NAT Forwarding
- VPN Server
- Customize Your Network Settings
- Manage the Router
- 13. 1. Set Up System Time
- 13. 2. Test the Network Connectivity
- 13. 3. Upgrade the Firmware
- 13. 4. Backup and Restore Configuration Settings
- 13. 5. Change the Administrator Account
- 13. 6. Password Recovery
- 13. 7. Local Management
- 13. 8. Remote Management
- 13. 9. System Log
- 13. 10. Monitor the Internet Traffic Statistics
- 13. 11. Control LEDs
- FAQ
- Specifications
- AD7200_警语

10
Chapter 2
2. 1. Position Your Router
• The Product should not be located where it will be exposed to moisture or excessive
heat.
• Place the router in a location where it can be connected to the various devices as well
as to a power source.
• Make sure the cables and power cord are safely placed out of the way so they do not
create a tripping hazard.
• The router can be placed on a shelf or desktop.
• Keep away from the strong electromagnetic radiation and the device of
electromagnetic sensitive.
2. 2. Connect Your Router
1. Follow the steps below to connect your router.
If your Internet connection is through an Ethernet cable from the wall instead of
through a DSL / Cable / Satellite modem, connect the Ethernet cable directly to the
router’s Internet port, then follow steps 5 and 6 to complete the hardware connection.
1 ) Place the router horizontally and extend the antennas to the maximum angle.
Note:
For best performance, horizontal installation is recommended. Antenna direction and position can affect
performance in vertical installation situations.