LCD-2001VB Sunlight Readable 20.1" LCD Display (1st Edition 11/25/2004 ) All information is subject to change without notice. R ○ 1319 Dexter Avenue N.
Content Introduction........................................................................................................... 3 Hardware Installation............................................................................................ 3 The Display Timing............................................................................................... 5 The Display Outline Dimensions.......................................................................... 6 The Display Controls .....................
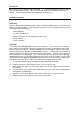
Introduction Welcome to enjoy the fantastic sightseeing world. This new technology will bring you the whole new feeling about the “monitor”. We show here some of the major advantages of the LCD monitor. You will really find some other advantages when you use it. Hardware Installation This chapter will guide you the correct installation procedures of your LCD monitor. Unpacking After you unpack your LCD Monitor, please make sure that the following items are included in the carton and in good condition.
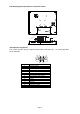
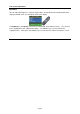
The following picture provides the connection outline AV in S-video VGA AV Audio in Audio in TV Tuner DC Power in VGA Input Pin Assignment This section describes the pin assignment of the LCD’s VGA connector. It is called 15pin Mini D-sub connector. 10 Pin No. 1 2 3 4 5 6 7 8 9 10 11 12 13 14 15 5 1 15 11 Signal Connector Red Video Signal Green Video Signal Blue Video Signal N.C. Ground Ground for red video signal Ground for green video signal Ground for blue video signal N.C. Ground N.C.
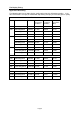
The Display Timing Applicable video timing The following table lists the better display quality modes that the LCD monitor provides. If the other video modes are input, the monitor will stop working or display unsatisfactory picture quality. VESA Modes Mode Resolution Total Nominal Frequency ±0.5KHz Nominal Frequency ±0.5KHz Nominal Pixel Clock (MHz) DOS 720x400@70Hz 900x449 31.469 70.087 28.322 VGA 640x480@60Hz 800x525 31.469 59.940 25.175 640x480@72Hz 832x520 37.861 72.809 31.
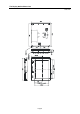
The Display Outline Dimensions Unit: mm Page 6
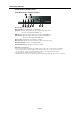
The Display Controls Contro l F u nction Side Membrane Control Button Œ Power Key : Power ON/Off. • Power LED : Power O N-Green / Power Off-No. Ž Up K ey : Inc rease item number or value o f the selec ted item when. In cr ease vol ume gain when OSD i s off. • M enu Key : Enter the main men u of the on-screen d isplay (OS D). • Do wn Key : Decrease itemnum ber or item vallue when OSD i s on. Decrease volume g ain when OSD is off . ‘ Select Key : Activate the select ed icon or function.
The Screen Adjustment Main Menu You can adjust the brightness, contrast, display colors, the horizontal and vertical position of the display and OSD menu, etc. through the main menu display. The Down Key < and Up Key >are used to scroll through items within the menu. The selected item is highlighted as the scrolling move along. The SELECT key is used to activate the highlighted item. During this state, MENU key is used to close the OSD menu from the screen.
The Screen Adjustment OSD Control Key Power key : Power ON/OFF. Menu key : Enter the main menu of the on-screen display (OSD). Down key : Decrease item number or item value when OSD is on. Decrease volume gain when OSD is off. Up key : Increase item number or value of the selected item when . Increase volume gain when OSD is off. Select key : Activate the selected icon or function. Source key : Input source select (PC, AV, S-Video ,TV, Component). Channel up key : Increase TV channel number.
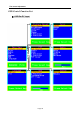
The Screen Adjustment OSD Control Function List ◆ OSD For PC input Page 10
The Screen Adjustment z Main Menu Press “Up” or “Down” to locate the item you desire to change, then press “Select” to make the adjustment, press “Menu” again to go back to previous menu. Picture Adjust This item can adjust Auto Adjust, Brightness, Contrast, Pixel Clock, Phase, H-Position and V-Position for an optimal image. Color This item can select 9300/6500 color temperature or adjust USER color. Audio This item can adjust audio function, as Volume, Mute, Treble, Base, Balance.
The Screen Adjustment Press “Up” or “Down“ to adjust the parameter. Horizontal Position Moves the display picture. Press “Up” to the right or press “Down“ to the left. Vertical Position Moves the display picture. Press “Up” to the up or press “Down“ to the down. z Color 9300K Select 9300 color temperature Press “Select” to execute. 6500K Select 6500 color temperature Press “Select” to execute. User Select USER color temperature Press “Select” to execute.
The Screen Adjustment Audio Volume Adjust Volume gain Press “Up” to increase or press “Down“ to decrease. Mute Set Audio mute. Press “Up” to execute mute or Press “Down“ to release mute. Treble Adjust audio Treble . Press “Up” to increase or press “Down“ to decrease. Bass Adjust audio bass . Press “Up” to increase or press “Down“ to decrease. Balance Input source select. Press “Up” to right or press “Down“ to left.
The Screen Adjustment PIP Sub Source This item can select sub source (Off, AV, S-Video, TV, and Component) Press “Select” to execute.. Audio Select audio come from Main Source or Sub Source. Press “Up” to come form Main Source Press “Down” to come form Sub Source. Size Change the Sub Picture Size. It supports 4 step size( 0% ,33% ,66%, 100%) Press “Up “ to enlarge the sub picture Press “Down” to reduce the sub picture. H-Position Moves the Sub Picture.
The Screen Adjustment Press “Up” to the up or press “Down“ to the down. PIP Color Change the Sub Picture color setting. Press “Select” to execute. Five items can be adjusted in PIP color function Brightness: Adjusts the sub picture brightness. Contrast: Adjusts the sub picture contrast. Saturation: Between colorful and colorless. Hue: Color varying Sharpness: Adjusts the Sharpness. Press “Up” to increase or press “Down“ to decrease. System Recall Restore the default value.
The Screen Adjustment OSD V-Position Adjusts the OSD position up or down Press “Up” to up, press “Down“ to down. OSD Transparence Adjusts the OSD transparency. Press “Up” or “Down“ to adjust the parameter. Off Time Adjusts the OSD exit time. Press “Up” or “Down“ to adjust the parameter. ◆ OSD For Video input Press “Up” or “Down” to locate the item you desire to change, then press “Select” to make the adjustment, press “Menu” again to go back to previous menu.
The Screen Adjustment Image Adjust This item can adjust video color as Brightness, Contrast, Saturation Hue, Sharpness. Audio This item can adjust audio function. As Volume, Mute, Treble, Base, Balance. System This item can Select Source input (PC, AV, S-Video, TV, Component.) and Recall System data. OSD This item can control OSD window function. As OSD H-Position, OSD V-Position, OSD Transparence and OSD Off time.
The Screen Adjustment . Remote Control Function List 1. POWER Power On/Off. 2. Input Source Select TV: Select TV video input. PC: Select PC-VGA input. AV: Select AV video input. S-VIDEO: Select S-VIDEO video input. COMP.: Select Component video input 14 3. MEMORY Channel memories or erase. 13 4. OSD Control MENU: Turns On/Off the On-Screen Display. SELECT: Execute your selection. “-“: Select the Item or decrease the value. “+”: Select the Item or increase the value. 12 1 5. MUTE Sound On or Off.
Quick Installation & Troubleshooting Tips Please foll ow t he following descriptions stepby step. (The 7 diagrams can also be your references): Step 1 Step 2 Step 3 Step 4 Step 5 Ste p 6 Step 7 Step 1 Plug o neterminal of the VGA cable to the sig nal conne ctor at th e rear of t he LCD M onitor. Step 2 Plug theother terminal o f the VGA cable to t he signal connecto r at the r e ar of PC. Step 3 Plug A dapter ou tput to th e jack at t he rear of LCD Monitor.
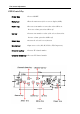
Specification Model No. Display Area LCD Display Display Colors Luminance Contrast Ratio Resolution Pixel Arrangement Pixel Pitch Viewing Angle Color Gamut Response Time Sync Signal Connector F/R Control Button OSD Menu Power Consumption Module Size Weight (Net) LCD-2001VB 408 (H) x 306 (V) mm 20.1" TFT active matrix 16.7M colors 1000 cd/m 2 (typ.) 500:1 (typ.) 800 x 600 (SVGA) RGB (Red, Green, Blue) vertical stripe 0.51 (H) x 0.51 (V) mm At the contrast ratio 10:1 - Horizontal: Left side 85° (typ.
Product Safety Precautions Follow all warnings and instructions marked on the product. Do not use this product near water. This display should be installed on a solid horizontal base. When cleaning, use only a neutral detergent cleaner with a soft damp cloth. Do not spray with liquid or aerosol cleaners. Do not expose this display to direct sunlight or heat. Hot air may cause damage to the cabinet and other parts.
ONE YEAR LIMITED WARRANTY ToteVision warrants to the original purchaser that this product is free from defects in workmanship and material under normal use and conditions for a period of 1 year from the date of original purchase, subject to the limitations below. Should service be required by reason of any defect or malfunction during the warranty period, ToteVision will repair or at its discretion replace this product, without charge (except for a $15.