User Manual Portable Air Conditioner Before using your TOSOT Portable Air Conditioner please read this user manual in its entirety.
Welcome to the TOSOT Direct Family! We’re extremely happy to welcome you as a new member of our family! Please read the tips below before using your product for the first time. Tips for First-Time Use 1. The portable air conditioner is a heavy object, which needs two or more people to lift and install. Failed to do so could result in injury or other accidents. 2. Allow the unit to sit upright for at least 3-4 hours before powering on.
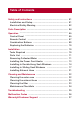
Table of Contents Safety and Instructions ------------------------------------------- 01 Installation and Setup ------------------------------------------- 01 Electrical Safety Warning --------------------------------------- 02 Parts Description --------------------------------------------------- 04 Operation -----------------------------------------------------------Control Panel ----------------------------------------------------Remote Control -------------------------------------------------Combination
Safety and Instructions Please read all instructions before use and save this user manual for future reference. A digital version can be obtained from Customer Support. Your safety and the safety of others are very important to us. We have provided many important safety messages throughout this manual and on the appliance itself. Always read and follow all posted safety messages.
● Only use the appliance in an upright position. Make sure the angle of inclination <10°. Always place the appliance on a stable, flat, level surface to prevent the air conditioner from overturning. Electrical Safety Warning ● If the power cable is damaged, it must be replaced by the manufacturer or an authorized technical service center in order to avoid all risk. ● During the installing or moving the appliance, be careful not to pinch, crush, or damage the power cord.
● Be sure that the air conditioner is properly grounded. To minimize shock and fire hazards, proper grounding is important. The power cord is equipped with a threeprong grounding plug for protection against shock hazards. ● Do not run the air conditioner without the white plastic shell in place. This could result in mechanical damage within the air conditioner.
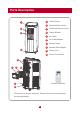
Parts Description 1 Control Panel 2 Vertical Airflow Louver 2 3 Horizontal Airflow Louver 3 4 Caster Wheels 5 Air Intake 6 Air Outlet Adapter 7 Exhaust Hose 8 Window Slide Adapter 9 Power Cord 11 4 10 Power Cord Hooks 5 8 7 6 9 Remote controller 10 This picture is only for reference. Please refer to the actual product for the appearance.
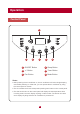
Operation Control Panel 2 3 4 1 5 6 1 ON/OFF Button 4 Sleep Button 2 +/- Button 5 Timer Button 3 Fan Button 6 Mode Button Notes: ● After powering the air conditioner on, the air conditioner will emit a single beeping sound after powering on. After that, you can operate the air conditioner by using the control panel or remote. ● The air conditioner will emit a beep after pressing each button on the control panel.
1 ON/OFF Button Press to power the air conditioner ON or OFF. 2 +/- Button ● Pressing this button will allow you to change the temperature setting. Holding either button will increase or decrease automatically. It will take 3 seconds for the temperature settings to be confirmed by the machine. ● After pressing the timer button, the +/- buttons will adjust the timer setting from 0.5-24 hours in 0.5-hour increments. After the 10-hour mark, the +/- button will adjust the timer setting in 1-hour increments.
Remote Control This is a universal remote control for a variety of models. If your model does not have a function listed on the remote control, there will be no changes in the operation of your unit. The max range of the remote control is 25 feet with no obstacles or interference from other devices, such as wireless phones or fluorescent lamps. The air conditioner will emit a beep sound if the signal from the remote has been received successfully.
1 ON/OFF Button Press to power the air conditioner ON or OFF. 2 Mode Button ● Press this button to cycle through the following modes. A corresponding logo indicator on the left side of the remote will be shown. ● a. Cool mode: standard cooling mode. The set temperature and fan speed can both be adjusted. b. Dry mode: the unit will run on low speed for dehumidification. The fan speed cannot be adjusted. c. Fan Only mode: the air conditioner will not produce cool air, only blow air from the outside.
6 Sleep Button Press this button to enter the sleep operation mode. While in sleep mode, you can only use the Cool modes. When in sleep mode, the AC temperature will automatically increase by 2°F for first hour and 4°F for second hour and then will keep running with this temperature. 7 Timer Button Press this button to activate the timer button. Use the +/- buttons to adjust the length of the timer before the unit powers off. The time setting range is 0.5-24 hours, in 0.5-hour increments.
Replacing the Batteries 1. Press the back side of the remote control battery cover and slide out following the engraved arrow. 2. Replace with two new AAA(1.5V) batteries (not included) of the same make and model. Make sure the polarities (+ & -) are aligned correctly. battery reinstall remove cover of battery box 3. Reinstall the battery cover box. Installation Tools Required The following tools will be needed before starting installation.
Parts List joint A joint B window panel wire hook drainage pipe sponge A joint C exhaust hose adapter window fastener protective grille screw rain shield pipe clip rubber plug nut support bolt spring washer washer pipe hoop remote control sponge B drain hose Removing Collected Water There are 2 ways to remove collected water from the air conditioner. The drainage hose needs to be installed first, following the step below. Installing the drainage pipe 1.
2. Use a screw to attach the drainage pipe clip on the bottom right side of the rear case. drainage port screw drainage pipe clip 3. Insert the drainage pipe into the drainage port, then attach the pipe hoop to keep the hose secure. 4. Insert the rubber plug into the other side of the drainage pipe, attach a pipe hoop to keep the plug secure, then attach the drainage hose into the drainage pipe clip.
2. Screw the drain hose adapter into the spout by twisting clockwise. 3. Insert the drainage hose into the drain connector. Note: When using the continuous drainage option, make sure that the air conditioner is located on a flat, level surface and that the drain hose is directed downwards and clear of any obstructions. Placing the air conditioner on an uneven surface may result in the chassis filling with water until the H8 malfunction code is displayed.
Installing in Double-Hung Sash Windows Note: If the width of your window is smaller than 20.5 inches, please remove the adjusting panel from the window panel and then cut the window panel to make the width of the window panel the same width as your window. 1. Assemble the rear clip by snapping the Joint B and Joint C together. rear connector (upper) clasp rear connector (lower) 2. Snap the attached Joints B+C into place on the inner side of the window panel. window panel joint B+C inner side 3.
4. Attach the rain shield and rain shield support to the outside of the window panel by using the included nut, spring washer, washer, and bolts. nut screws spring washer washer support washer bolt nut rain shield spring washer 5. Cut Sponge B to the width of your window and attach it to the bottom of the window sill. sponge B (adhesive) 6.
Note: If the width of your window is smaller than 20.5 inches, please remove the adjusting panel from the window panel and then cut the window panel to make the width of the window panel the same width as your window. Window panel assemble Window panel adjustment panel <20.5" Cut Window stool Note: if the width of your window is greater than 56.7 inches, attach the extension panel to the adjustment panel to make the width of the window panel the same width as your window.
9. Cut Sponge A to the width of your window to seal the gap between the upper part of the inner window sash and the outer window sash. sponge A outer window inner window 10. To prevent the window from sliding vertically, fix the inner window in place by using the window bracket and screw. The placement of the bracket will differ depending on whether you have a plastic or wooden window. plastic window window sash window bracket wooden window Installing in Sliding Sash Windows 1.
2. Snap the attached Joints B+C into place on the inner side of the window panel. window panel joint B+C inner side 3. Attach the protective grill on the outer side of the window panel to Joint B+C with included screws. screws protective grille 4. Attach the rain shield and rain shield support to the outside of the window panel by using the included nut, spring washer, washer, and bolts. Screws Rain Shield Washer Spring washer Nut 5.
6. Place the assembled window panel on the window sill and adjust until it fully covers the height of your window, then screw the window panel into place on the window sill. Adjustment panel Adjustment panel Screws Window panel assemble 20.5"~37.4" Note: If the height of your window is smaller than 20.5 inches, please remove the adjusting panel from the window panel and then cut the window panel to make the height of the window panel the same height as your window.
7. Cut Sponge B to the height of your window and attach to the assembled window panel. 8. Close the window sash tightly against the assembled window panel. sponge B (adhesive) 9. Cut Sponge A to the width of your window to seal the gap between the inner window sash and the outer window sash. outer window sponge A inner window 10. To prevent the window from sliding horizontally, fix the inner window in place by using the window bracket and screw.
Installing Exhaust Hose 1. Rotate Joint A clockwise onto the end of the exhaust hose. exhaust hose Join A clockwise 2. Rotate the open end of the exhaust hose clockwise into Joint B+C on the assembled window panel. Heat discharge pipe clockwise Join A 3. Insert Joint A from the exhaust hose into the groove on the rear of the air conditioner until it snaps into place.
Tips: In order to improve the cooling efficiency of your air conditioner, the heat discharge pipe should be as short and direct as possible. Our suggested configuration is shown below. under 51 inches correct about 24 inches wrong Cleaning and Maintenance To avoid electric shock, turn off the air conditioner and disconnect from power before cleaning. Do not wash or douse the air conditioner with water. NEVER use abrasive or flammable solvents to clean the heater.
Cleaning the exhaust hose Remove the exhaust hose from the air conditioner, clean with a soft cloth soaked in warm water. Let dry completely before reinstalling the exhaust hose. Cleaning the filter 1. Remove the filter Locate the filter and remove it from the air conditioner. You may need to move the filter around to loosen. 1 2 2. Clean the filter After removing, use the dust attachment of your vacuum or warm water mixed with a mild detergent. 3.
● Do not attempt to dry the filter with a hairdryer or other heating elements as this may deform or ignite the filter. ● Do not operate the air conditioner if the air filter is missing.
Troubleshooting Issue Troubleshooting Solution Check whether the air outlet or inlet is blocked Remove the obstacles blocking the air outlets and inlets Check if the evaporator is defrosting After defrosting is finished, the AC will resume operation Is the unit in auto mode? Temp cannot be adjusted in auto mode Your desired temperature exceeds the AC range Temp set range is 61-86°F Air blowing from the air conditioner has a weird smell Check if the source of the odor is somewhere in the room Re
Malfunction Codes If you experience any of the below malfunction codes, remove the unit from power for a few minutes. Plug the unit back in to determine if the malfunction code is still present.
Warranty & Customer Support Warranty Information 1. 1-Year warranty: TOSOT Portable Air Conditioner comes with a 1-year warranty from the date of purchase. This warranty covers manufacturing and material defects. Please visit https://tosotdirect.com/warranty for more terms&policy. 2. Additional 6-Month warranty extension: You can get a 6-month warranty extension by registering your new product at www.tosotdirect.com/extend and answering a short questionnaire.
66129935190