
Operation Manual
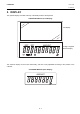
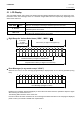

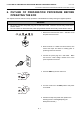
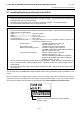
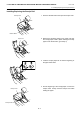


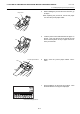
Table Of Contents
- Safety Summary
- OPERATOR’S GUIDE
- TO OUR CUSTOMERS
- ACCESSORIES
- APPEARANCE AND NOMENCLATURE
- MODE LOCK AND MODE SELECTOR KEYS
- DISPLAY
- OUTLINE OF PREPARATION PROCEDURE BEFORE
- CASHIER SIGNING OR CASHIER KEY OPERATIONS
- KEYBOARD LAYOUT
- FUNCTIONS OF EACH KEY
- DAILY OPERATION FLOW
- REGISTERING PROCEDURE AND PRINT FORMAT
- No-Sale
- Department Entry
- PLU Entry (Manual PLU Code Entry)
- PLU Price Shift Entry
- Repeat Entry
- Quantity Extension (Multiplication) for DEPTs/PLUs
- Single-Item Department or Single-Item PLU Entry
- Returned Merchandise
- Amount Discount
- Percent Discount, Percent Charge
- Store Coupon
- Vendor Coupon
- Item Correct
- Void
- All Void
- Non-Add Number Print
- Listing Capacity Open
- Tax Status Modification
- Subtotal (Sale Total Pre-taxed) Read
- VAT Calculation and Print (VAT = Value Added Tax)
- VAT Print
- Add-on Tax Calculation and Print
- Tax Exemption (for Add-on Tax Feature)
- VAT Exemption (for VAT Feature)
- Finalizing a Sale
- Multi-Tendering
- Split Tendering
- Cheque Cashing (No-sale cashing of a non-cash media)
- Special Rounding
- Denmark Rounding
- Sale Paid in Foreign Currencies
- No-Sale Exchange from Foreign Currency to Domestic Currency
- No-Sale Exchange from Domestic Currency to Foreign Currency
- Paid-Out
- Received-on-Account
- Salesperson Entry (Salesperson Sign-ON)
- Receipt-Issue/Non-Issue Selection
- Receipt Post-Issue
- Charge Posting: Previous Balance Manual Entry Type
- Journal Print (Thailand Specification)
- VAT Total Display
- Consignment Print
- Validation Print
- Remote Slip Printer (hardware option) Operation
- When a Power Failure Occurs...
- JOURNAL AND RECEIPT PAPER-END DETECTOR
- PRINTER HEAD OPEN DETECTOR
- REMOTE SLIP PRINTER MOTOR LOCK DETECTOR
- GENERAL MAINTENANCE
- SPECIFICATIONS
- MANAGER’S GUIDE
- OPERATIONS IN “MGR” MODE
- OPERATIONS IN “ - ” MODE
- READ (X) AND RESET (Z) REPORTS
- PROGRAMMING OPERATIONS
- Instructions for Programming
- Character Entries
- Condition Required for Programming Operations
- SET Mode Menu
- Time Setting or Adjustment
- Date Setting or Adjustment
- Commercial Message Programming
- Footer Message Programming
- Store Name Message Programming
- Cashier Name and Status Programming
- Department Name Programming
- Department Group Name Programming
- PLU Name Programming
- Salesperson Name Programming
- Department Table Programming
- PLU Table Programming
- Department Preset Price Setting or Changing
- PLU Preset Price Setting or Changing
- %+ and %- Preset Rate Setting
- Foreign Currency Exchange Rate Setting
- VERIFICATION OF PROGRAMMED DATA

6. OUTLINE OF PREPARATION PROCEDURE BEFORE OPERATING THE ECR EO1-11154
6.1 Installing/Replacing the Receipt/Journal Roll
6- 5
When the journal roll is installed for the first time or when the journal paper ends, the following error status is
indicated both on the LCD display and on the 10-digit 7-segment Numeric display. In this case, install or replace
the journal roll by following the procedure below. (See Installing/Replacing the Journal Roll.)
P blinks on the third leftmost digit of the 10-digit 7-
segment Numeric display.
Installing/Replacing the Journal Roll
1. To remove the journal cover, insert the printer
cover key to the journal cover lock, and then turn it
90° clockwise.
2. When installing the journal roll for the first time, go
to Step 3.
When replacing the journal roll, remove the take-
up reel from the holder, then pull the paper out of
the reel.
CAUTION: Never try to pull out the remaining
paper end by hand. It may cause a
paper jam. The remaining paper
should be fully taken up by pressing
the [JF] key.
3. Push the release button to raise the journal paper
retainer.
Journal Cover
Take-up Reel
Journal Paper
2
1
Release Button
Journal Paper Retainer.