
Operation Manual
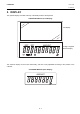
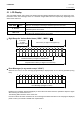

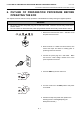


Table Of Contents
- Safety Summary
- OPERATOR’S GUIDE
- TO OUR CUSTOMERS
- ACCESSORIES
- APPEARANCE AND NOMENCLATURE
- MODE LOCK AND MODE SELECTOR KEYS
- DISPLAY
- OUTLINE OF PREPARATION PROCEDURE BEFORE
- CASHIER SIGNING OR CASHIER KEY OPERATIONS
- KEYBOARD LAYOUT
- FUNCTIONS OF EACH KEY
- DAILY OPERATION FLOW
- REGISTERING PROCEDURE AND PRINT FORMAT
- No-Sale
- Department Entry
- PLU Entry (Manual PLU Code Entry)
- PLU Price Shift Entry
- Repeat Entry
- Quantity Extension (Multiplication) for DEPTs/PLUs
- Single-Item Department or Single-Item PLU Entry
- Returned Merchandise
- Amount Discount
- Percent Discount, Percent Charge
- Store Coupon
- Vendor Coupon
- Item Correct
- Void
- All Void
- Non-Add Number Print
- Listing Capacity Open
- Tax Status Modification
- Subtotal (Sale Total Pre-taxed) Read
- VAT Calculation and Print (VAT = Value Added Tax)
- VAT Print
- Add-on Tax Calculation and Print
- Tax Exemption (for Add-on Tax Feature)
- VAT Exemption (for VAT Feature)
- Finalizing a Sale
- Multi-Tendering
- Split Tendering
- Cheque Cashing (No-sale cashing of a non-cash media)
- Special Rounding
- Denmark Rounding
- Sale Paid in Foreign Currencies
- No-Sale Exchange from Foreign Currency to Domestic Currency
- No-Sale Exchange from Domestic Currency to Foreign Currency
- Paid-Out
- Received-on-Account
- Salesperson Entry (Salesperson Sign-ON)
- Receipt-Issue/Non-Issue Selection
- Receipt Post-Issue
- Charge Posting: Previous Balance Manual Entry Type
- Journal Print (Thailand Specification)
- VAT Total Display
- Consignment Print
- Validation Print
- Remote Slip Printer (hardware option) Operation
- When a Power Failure Occurs...
- JOURNAL AND RECEIPT PAPER-END DETECTOR
- PRINTER HEAD OPEN DETECTOR
- REMOTE SLIP PRINTER MOTOR LOCK DETECTOR
- GENERAL MAINTENANCE
- SPECIFICATIONS
- MANAGER’S GUIDE
- OPERATIONS IN “MGR” MODE
- OPERATIONS IN “ - ” MODE
- READ (X) AND RESET (Z) REPORTS
- PROGRAMMING OPERATIONS
- Instructions for Programming
- Character Entries
- Condition Required for Programming Operations
- SET Mode Menu
- Time Setting or Adjustment
- Date Setting or Adjustment
- Commercial Message Programming
- Footer Message Programming
- Store Name Message Programming
- Cashier Name and Status Programming
- Department Name Programming
- Department Group Name Programming
- PLU Name Programming
- Salesperson Name Programming
- Department Table Programming
- PLU Table Programming
- Department Preset Price Setting or Changing
- PLU Preset Price Setting or Changing
- %+ and %- Preset Rate Setting
- Foreign Currency Exchange Rate Setting
- VERIFICATION OF PROGRAMMED DATA
6. OUTLINE OF PREPARATION PROCEDURE BEFORE OPERATING THE ECR EO1-11154
6. OUTLINE OF PREPARATION PROCEDURE BEFORE OPERATING THE ECR
6- 1
6. OUTLINE OF PREPARATION PROCEDURE BEFORE
OPERATING THE ECR
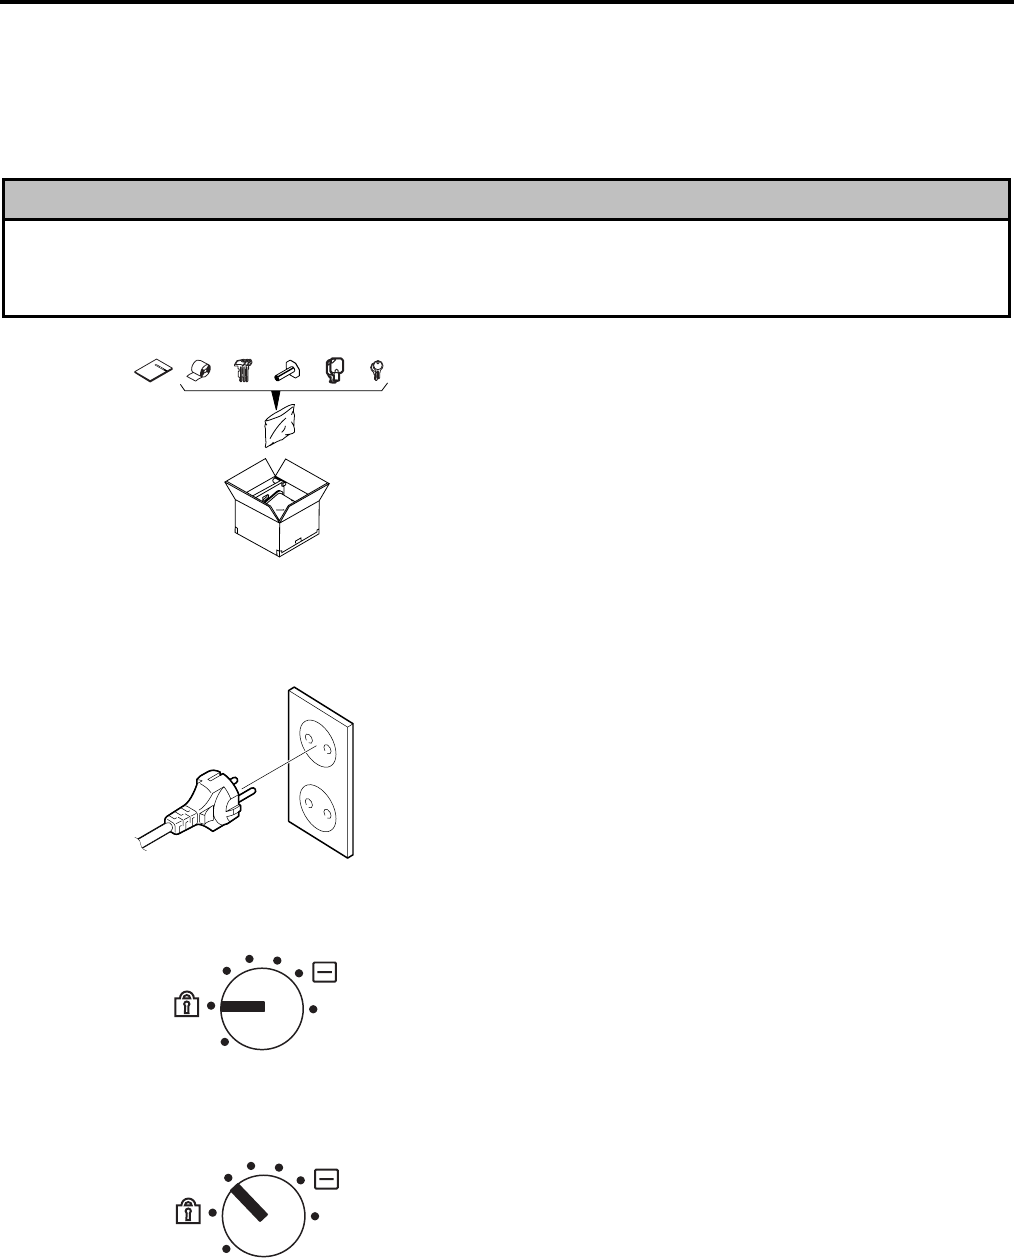
This chapter shows the outline of set-up procedure of the ECR before actually starting the register operation.
WARNING!
1. Be sure to connect the power plug into a rated wall outlet. Failure to do this may cause fire or
electric shock.
2. Do not connect or disconnect the power plug with wet hands as this may cause electric shock.
1. Remove the ECR from the carton. And take out all
the parts and accessories.
2. Place the ECR on a stable and level surface, then
remove the tapes and seals for holding parts or
protecting surface of the ECR.
3. Connect the power plug into a wall outlet. Make
sure that the outlet voltage matches that of the
power required for the ECR.
4. Insert the REG key into the mode lock.
5. Turn the mode lock to the REG position and power
on the ECR.
6. Install the receipt and journal rolls. (Refer to the
following section “Installing/Replacing the
Receipt/Journal Roll”.)
S
MA
REG
S
ET
Z
X
R
EG
MGR
S
ET
Z
X
R
EG
MGR