
Operation Manual


2. MAIN UNIT REPLACEMENT
EO18-11004A
2.10 Replacing the Printer Unit
2-11
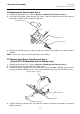
4) Remove the TP-3x8 screw which fixes the Earth Wire to the Printer Plate, and the remove the two
TP-3x8 screws to remove the Journal Printer Ass’y from the Bottom Cover.
5) Remove the FPC Cable of the Printer from CN3 on the P-Relay PC Board.
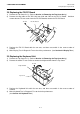
6) Remove the three DSM-2.5x6 screws to remove the Journal Printer Unit from the Printer Plate.
7) Replace the Journal Printer Unit with the new one, and then reassemble in the reverse order of
removal.
8) Make Print Test in Diagnostic Test to check the performance. (See Section 4.1 Print Test.)
Earth Wire
TP-3x8
Journal Printer Ass’y
TP-3x8
CN3
P-Relay PC Board
FPC Cable
Journal Printer Unit
Printer Plate
DSM-2.5x6
DSM-2.5x6