
User Manual


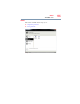


Table Of Contents
- Satellite® T110/T130 Series User’s Guide
- Contents
- Introduction
- Chapter 1: Getting Started
- Selecting a place to work
- Setting up your computer
- Connecting to a power source
- Charging the main battery
- Using the computer for the first time
- Registering your computer with Toshiba
- Adding optional external devices
- Adding memory (optional)
- Recovering the Internal Storage Drive
- Erasing the Internal Storage Drive
- Checking the internal storage drive operating status
- Using the TouchPad™
- Using external display devices
- Using an external keyboard
- Using a mouse
- Connecting a printer
- Turning off the computer
- Customizing your computer’s settings
- Caring for your computer
- Chapter 2: Learning the Basics
- Chapter 3: Mobile Computing
- Chapter 4: Exploring Your Computer’s Features
- Chapter 5: Utilities
- TOSHIBA Assist
- TOSHIBA Application Installer
- Setting passwords
- TOSHIBA Face Recognition Utility
- TOSHIBA PC Diagnostic Tool Utility
- TOSHIBA HDD Protection Utility
- TOSHIBA SD™ Memory Card Format Utility
- Mouse Utility
- TOSHIBA Hardware Setup
- USB Sleep and Charge Utility
- TOSHIBA Zooming Utility
- TOSHIBA Accessibility
- TOSHIBA eco Utility™
- TOSHIBA Service Station
- TOSHIBA PC Health Monitor
- ConfigFree®
- Chapter 6: If Something Goes Wrong
- Problems that are easy to fix
- Problems when you turn on the computer
- The Windows® operating system is not working
- Fixing a problem with Device Manager
- Memory problems
- Power and the batteries
- Keyboard problems
- Display problems
- Disk or storage drive problems
- Optical drive (optional) problems
- Sound system problems
- Printer problems
- Wireless networking problems
- Develop good computing habits
- If you need further assistance
- Other Toshiba Internet Web sites
- Toshiba’s worldwide offices
- Appendix A: Intel® Display Power Saving Technology
- Appendix B: Hot Keys/TOSHIBA Cards
- Appendix C: Power Cord/Cable Connectors
- Glossary
- Index

131
Exploring Your Computer’s Features
Using the Memory Card Reader
When inserting memory media, do not touch the metal contacts. You
could expose the storage area to static electricity, which can destroy
data.
Removing memory media
1 Prepare the card for removal by clicking on the Show hidden
icons ( ), if necessary, in the notification area and then
selecting the Safely Remove Hardware icon.
If the system is unable to prepare the media for safe removal, a
message will tell you to try again later. If the media can be
removed now, the system displays Safe to Remove Hardware.
If the computer has a spring-loaded adapter slot, see step 2;
otherwise, skip to step 3.
2 Gently press the card inward to release it.
The card pops out slightly.
3 Grasp the card and pull it straight out.
(Sample Illustration) Removing memory media
Do not remove memory media while data is being written or read.
Even when the Windows
®
message “copying...” disappears, writing
to the media might still be in progress and your data could be
destroyed. Wait for the indicator light to go out.