
Installation Instructions

RemovingtheRightCover
Note:Retainallthehardwarethatyouremoveinthis
procedure.
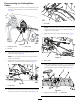
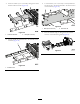
1.Removethenegative(–)cablefromthebatteryand
thenthepositive(+)cable.
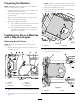
Figure4
1.Nut3.Bolt
2.Positivecable(+)4.Negativecable(–)
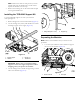
2.Removethe2angeboltsthatsecurethebatterytray
totheframe(Figure5).
Figure5
1.Flangebolt3.Rightpanelassembly
2.Self-tappingscrew
3.Removethe4screwssecuringtherightpaneltothe
lower-seatassembly(Figure5).
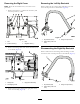
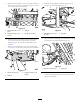
RemovingtheLeftHipRestraint
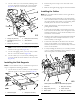
Removeandretainthe3angeboltsandangenutsthat
securethehiprestrainttothemachine(Figure6).
Figure6
1.Hiprestraint(short)3.Flangenut(5/16inch)
2.Flangebolt(5/16x3/4
inch)
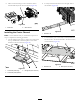
DisconnectingtheRightHipRestraint
Removeandretainthefrontangeboltandangenutthat
securesthefrontofthehiprestrainttothemachine(Figure7).
Figure7
1.Hiprestraint(tall)3.Flangenut(5/16inch)
2.Flangebolt(5/16x3/4
inch)
4