
Installation Instructions
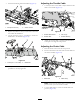

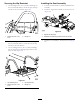


5.Removethe2screwsandnutsthatsecurethefuse
blocktothefrontbatterytray.
Figure58
1.Screw(#10x3/4inch)
3.Fuseblock
2.Nut(#10)
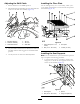
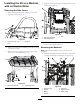
6.Removethe4boltssecuringthebatterytraytothe
machine(Figure59).
Figure59
1.Bolt
3.Bolt(3/8x3/4inch)
2.Flangenut(3/8inch)
7.Removethe2angenuts,butnotthe2bolts,that
connectthefrontandrearbatterytray(Figure59).
Important:Donotremovethe2boltsthatare
usedconnectthefrontandrearbatterytrays
together.
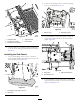
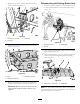
DisconnectingtheParking-BrakeCable
1.Loosenthejamnutandthenturntheadjustmentscrew
2turnscounterclockwiseonbothrear-brakecalipers
(Figure60).
Figure60
1.Adjustmentscrew3.Brakecable
2.Jamnut
2.Disconnecttheparking-brakecableconnectedtoeach
brakecaliper(Figure60).
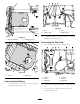
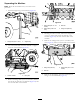
3.Removethe10screws(1/4x1-1/4inches)topartially
removethedashboardanddisconnecttheparking
brake(Figure61).
Figure61
1.Screw(1/4x1-1/4inches)
2.Dashboard
Note:Youmanyneedtoremovethecabletiesthatprevent
youfrompartiallyremovingthedashboard.Youwillneedto
replacethecabletiesinalaterstep.
19