
Installation Instructions
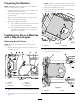
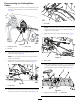
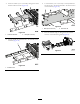

8.Usethe3bolts(3/8x2-1/2inches)andangenuts
tolooselyinstalltheextensionrailtotherearframe
(Figure28).Dothisonbothsidesofthemachine.
Figure28
1.Flangenut(3/8inch)4.Bolts(3/8x3-3/4inches)
2.Self-tappingscrew(1/4x
3/4inch)
5.Wireharness
3.Flangenut(3/8inch)6.Bolts(3/8x2-1/2inches)
Note:Ensurethatthewireharnessexitsthecenter
channelontherightside(Figure28).
9.Usetheself-tappingscrew(1/4x3/4inch)tobrake
lineteetothecenterchannel(Figure28).
10.Usethe2bolts(3/8x3-3/4inches)andangenuts
tolooselyinstallthecenterchanneltotherearmount
(Figure28).
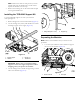
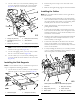
InstallingtheSideSupports
Note:Usethehardwarethatyouretainedfromaprevious
steptocompletethefollowingprocedure.
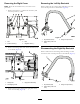
1.Usethe4bolts(5/16x3/4inch)tolooselyinstallthe
platformsupporttothecenterchannel(Figure30).
Figure29
1.Platformsupport2.Bolt(5/16x3/4inch)
2.Performtheprevioussteptotheothersideofthe
machine.
3.Removetheengineandlegsupportsfromthemachine.
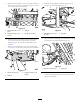
InstallingtheCables
Note:Exitthecablesandwireharnessontherightsideof
thecenterchannel.
1.Connecttheparking-brakecabletotheparking-brake
leverinthefrontsectionofthemachine,runitthrough
thecenterchannel,andconnectittotheparking-brake
assemblyintherearsectionofthemachine.
2.Adjustandtightenthescrewandjamnutforthe
parking-breakassembly.
3.Connectthethrottlecabletothethrottleleverinthe
frontsectionofthemachine,runitthroughthecenter
channel,andconnectittothethrottleassemblyinthe
rearsectionofthemachine.
4.Installthechokecablethroughthedashboardandrun
itthroughthecenterchannel,andconnectittothe
chokeassemblyontheengine.
5.Connecttheshiftcabletotheshiftleverinthefront
sectionofthemachine,runitthroughthecenter
channel,andconnectittotheshiftassemblyintherear
sectionofthemachine.
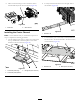
6.Looselyinstallingthe2bolts(3/8x3/4inch),16bolts
(1/4x1/2inch),and2angenuts(3/8inch)tosecure
thebottomplatetothecenterchannel.
Figure30
Somepartsarehiddenforillustrativepurposes.
1.Cableexit4.Bolt(3/8x3/4inch)
2.Flangenuts(3/8inch)5.Centerchannel
3.Bottomplate
6.Bolt(1/4x1/2inch)
10