
Installation Instructions
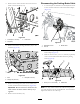
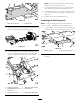
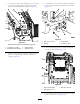

5.Usethe2boltwithwasherassemblies(1/4x1/2inch)
tosecuretheangled-supportbracketandseat-base
paneltotheleftandrightseatsupports(Figure86).
g197332
Figure86
Somepartsarehiddenforillustrativepurposes.
1.Screw(#10x1/2inch)3.Supportbracket
2.Boltwithwasherassembly
4.Seat-basepanel
6.Usethe5screws(#10x1/2inch)tosecuretheback
paneltotheangled-supportbracketandtheseat
supports(Figure86).
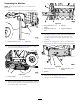
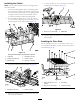
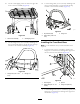
7.Usethe2bolts(1/4x2inches),washer,andlocknut
tosecuretheleftandrightpanelbracketthemachine
(Figure87).
g034121
Figure87
1.Bolt(1/4x2inches)
3.Panelbracket
2.Washer
4.Locknut(1/4inch)
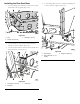
8.Usethe4self-tappingscrewstosecuretheleftside
covertotheseatassembly(Figure87).
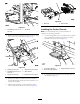
g035181
Figure88
1.Side-coverassembly3.Bolt(3/8x3/4inch)
2.Self-tappingscrew
9.Usethe2bolts(3/8x3/4inch)tosecurethecharger
brackettothebatterytray(Figure88).
29