
Installation Instructions

2
InstallingtheHose-ReelMount
Partsneededforthisprocedure:
1Hose-reelmount
1Tubemount
1
Hex-headscrew(1/2x2-1/4inches)
1
Locknut(1/2inch)
1
Clevispin(1/2x2inches)
1Hairpincotter
InstallingtheHose-ReelMounttothe
FrontoftheMachine
ForMachineswiththeFrontHitchKitwithaBrush
GuardInstalled
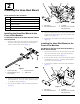
1.Insertthetubemountintothehose-reelmountuntil
theholesinthetubemountalignwiththefarthest
holesinthehose-reelmount(Figure1).
Figure1
1.Locknut(1/2inch)
3.Hose-reelmount
2.Hex-headscrew(1/2x
2-1/4inches)
4.Tubemount
2.Securethetubemounttothehose-reelmountwiththe
hex-headscrew(1/2x2-1/4inches)andthelocknut
(1/2inch)asshowninFigure1.
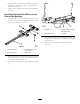
3.Loosenthe‘T’handleonthefronthitchattachment
(Figure2).
Figure2
1.Tubemount
3.‘T’handle
2.Fronthitchattachment
4.Clevispin(1/2x2inches)
andhairpincotter
4.Insertthetubemountintothefronthitchattachment
andsecureitwiththeclevispin(1/2x2inches)and
hairpincotter(Figure2).
5.Tightenthe‘T’handleonthefronthitchattachment
(Figure2).
InstallingtheHose-ReelMounttothe
FrontoftheMachine
ForMachineswiththeFrontHitchKitwithouta
BrushGuardInstalled
1.Insertthetubemountintothehose-reelmountuntil
theholesinthetubemountalignwiththefarthest
holesinthehose-reelmount(Figure1).
2.Securethetubemounttothehose-reelmountwiththe
hex-headscrew(1/2x2-1/4inches)andthelocknut
(1/2inch)asshowninFigure1.
3.Loosenthe‘T’handleonthefronthitchattachment
(Figure3).
Figure3
1.Tubemount
3.‘T’handle
2.Fronthitchattachment
4.Clevispin(1/2x2inches)
andhairpincotter
3