
Instructions for use kit F4-U Corsair Giant


- 21 -
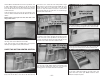
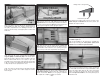
❏ ❏ 18. When satisfied with the fit of the top TE skin, wet
it again; apply medium or thick CA on ribs R-1 thorough
R-4, the center spar and the TE between R-1 and R-5.
Press the TE skin onto the structure and hold it in position
until the CA cures.
❏ ❏ 19. After the CA cures, trim the top TE skin to the
center of rib R-5 and flush with the TE. Glue the TE skin to
rib R-5.
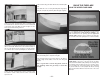
Repeat steps 17 through 19 for the other end of the
wing center section
❏ 20. Use 3/32" x 3" x 30" balsa sheets to skin the top of
the wing center section between the R-5 ribs.
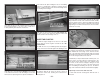
❏ 21. Turn the wing over and apply CA to any top skins
that may not be glued securely to the structure.
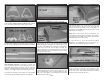
SHEET THE BOTTOM CENTER SECTION
❏ 1. We suggest adding a piece of left over 1/8" [3.2mm]
balsa, from the rib dies, to the side of ribs R-4 and R-5,
between the servo hatch rails. This will provide a larger
gluing surface for the bottom wing skins. Note: All of the
bottom center skins are cut from 3/32" x 3" x 24" balsa
sheets. You may find it faster and easier to skin both the
left and right sides at the same time to avoid having to
determine skin shapes twice.
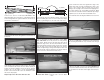
❏ ❏ 2. Cut a 3/32" [2.4mm] balsa skin to fit between ribs
R-1 and the center of R-5. The first skin should cover the
aft half of the main center spar. Wet the skin and glue it to
the main spar and ribs starting at rib R-1. Do not glue the
skin to the servo hatch rails or the doubler on R-4.
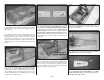
❏ ❏ 3. Use the flap hatch as a template to trim the skin
that covers the R-4 rib doubler and the forward half of the
hatch rail. After trimming the skin from over the hatch
opening, glue it to the hatch rail and the rib doubler.
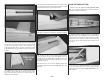
❏ ❏ 4. Trim and glue a second skin to fit aft of the first skin.
Trim the hatch opening and glue the skin to the hatch rails.
❏ ❏ 5. Trim and glue a third skin aft of the second skin.
After the glue has cured, trim the skin flush with the TE.
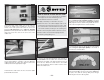
❏ ❏ 6. Glue the shelf rib R-3C to the side of rib R-3 with
the aft edge of R-3C flush with the aft edge of R-3 and
against the main center spar. Note: R-3C has been
stained for clarity in the photo.