
User manual Stinson Reliant SR9 (1/5)


BUILD THE FUSELAGE
The bottom half of the fuselage is framed upside-
down over the plan. This ensures that you have a
straight, true structure from which to build. After the
bottom half is constructed, it is removed from the
plan, then the tops of the formers and remaining
stringers are added to it. But, before you can begin
constructing the bottom half of the fuse, you must
build the formers. The formers are constructed over
the plan just the same as the wing and tail surfaces.
The “tr ueness” and “straightness” of the fuse greatly
depends upon how accurately you build the formers.
Therefore, it is important to work carefully. As
mentioned earlier in the manual, refrain from using
excessive CA that will interfere with parts that will be
added later. You can reinforce glue joints that don’t
look strong after the fuse is completed.
Build the formers
All the formers are constructed basically the same
way. Detailed instructions are provided for building
the first one, with notes where necessary to build
the others. The bottom and top of the formers are
built separately.
Star t with former 3...
❏ 1. Cover the former drawings on the plan with
Great Planes Plan Protector or wax paper.
❏ 2. Using the plan and the die-drawings on pages
8 & 9, identify all the die-cut 1/8” balsa and ply par ts
used to construct former 3. Remove the parts from
their die sheets. While you’re at it, you could gather
the par ts required for the rest of the for mers and set
them aside, or remo v e the parts from their die sheets
as you need them.
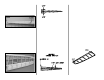
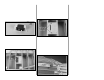
❏ 3. Make a 1/4" bottom former side by gluing
together two die-cut 1/8" balsa F3SB former sides.
❏ 4. Make the other bottom former side and two top
former sides (F3ST) the same way.
❏ 5. Position the laminated bottom former sides
F3SB over the plan and hold them in position with
T-pins. Build the frame w ork around the bottom half of
F3 from a 1/4" x 3/4" x 36" balsa stick, a 1/4" x 1/2"
x 24" balsa stick, and a 1/4" x 1/4" x 36" balsa stick.
Note that some of the bracing is temporary and will
be removed from the structure after the fuselage is
fully framed. This ensures that the formers remain
square during fuselage constr uction.
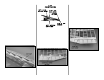
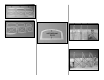
❏ 6. Glue two die-cut 1/8" plywood bottom corner
braces F3CB to the bottom of F3 where shown.
Remove the former from the plan, then glue two
more corner braces to the other side.
❏ 7. Build the top of former F3 over the plan the
same wa y. Glue the die-cut 1/8" balsa former top F3T
to the assembly. Add the die-cut 1/8" plywood top
corner braces F3CT while the f ormer is still pinned to
your building board. Remove the assembly from the
plan and glue the corner braces to the other side.
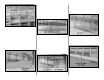
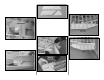
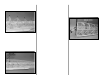
❏ 8. Refer to the f ollowing photos and notes to build
formers 4 through 8 from the die-cut parts and balsa
sticks specified on the plan.
- 27 -