
User manual Stinson Reliant SR9 (1/5)


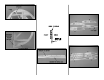
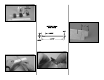


Use this photo and the sketch below for the
following four steps.
❏❏9. Use 3/32" x 5/8" x 24" balsa sticks to make
the elevator ribs that align with stab ribs 2, 3, 4, 5
and 6 for both sides of the elevator. Notice that the
ribs should be 1/16" below the elevator LE and taper
to a point at the TE to accommodate the cap strips.
Glue the ribs to the elevator.
❏❏10. Cut the cap strips for both sides of the
ele vator ribs from a 1/16" x 1/4" x 36" balsa stick and
glue them in place. Sand the ends of the cap strips
even with the elevator core.
❏❏11. Of the remaining 1/16" x 1/4" x 36" sticks
supplied, select four of the softest sticks for the
elevator edging. Glue one of the sticks to the edge
of the elevator as shown on the plan. This is easily
done if you begin at the tip (at ribs S7A), use thin CA
to glue just a couple of inches at a time and keep the
edging centered as you proceed toward the root.
When you near the curve at the root, use a fine raz o r
saw to lightly cut part way through the inside of the
edging to assist in bending around the curve. Trim
the edging to the correct length, bend it around the
cur ve and glue it in place.
❏❏12. Bend an additional 1/16" x 1/4" x 36" stick
around the first layer of edging and glue it in place
with medium CA.
❏❏13. Make the last rib f or the end of the elevator
from one of the 1/4" x 1/4" rib jigs you used when
framing the stab. Sand the rib to blend with the rest
of the structure, then carefully sand the elevator
edging and the elevator cap strips, blending them
as well. Round the leading edge of the stab as
shown in the cross section of the plan and finish
sanding the elevator and stab, carefully blending all
surfaces together.
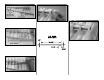
❏❏14. Remove the elevator from the stab. Make
the elevator control horn mounting block for the
bottom of the elevator from the 5/8" x 5/8" x 22"
basswood stick and glue it to the bottom of the
elevator. Make the elevator ribs for the end of the
elevator from leftover 1/8" balsa and glue them in
position, then blend the ribs, elevator LE and control
horn block by sanding.
Set the first ele vator aside , take a break, clean off y our
workbench and return to step four and build the right
elevator. We’ll see you when you get back to here!
Hinge the elevators
❏
1. Make the elevator hinge blocks from leftover
3/16" balsa and 1/4" x 7/16" balsa. Glue them in
place on both sides of the elevator. Notice that the
hinge blocks should slide under the cap strips and
next to the elevator ribs so they will rest below the
covering when it is applied.
❏ 2. See the Hot Tip that follows, then drill holes or
cut slots for your hinges (not supplied) in both
elevators and the stab.
- 14 -