
User manual Cessna 182


If you plan to compete with the trim scheme
shown on the box, here are a few things
to consider:
The full-size Cessna 182 “Q” Skylane,
N735PE, that was modeled for this kit is hang-
ered near Birmingham, Alabama. The 182Q ver-
sion was manufactured from 1977 through 1980.
During this time 2,540 were built. We designed
our model from Cessna’s own 1979 3-view draw-
ings for accurate scale outline.
If you plan to enter your Skylane in competi-
tion, this kit will qualify for the Sport Scale cate-
gory without any changes. Always work from
photos of a full-size aircraft when finishing your
model because that is what you will need for
judging documentation. For dimensional accura-
cy, the Top Flite Cessna 182 is exactly 1:5
1
¼
3
scale.
❏ 4 to 6 channel radio with 5 to 7 servos.
❏ Engine (see page 4)
❏ Propellers (see engine instructions for
recommended sizes).
❏ 1 or 2 Pilot figures (1/5 scale recommended)
❏ Fuel Tank (Great Planes
®
12 oz. GPMQ4105
recommended)
❏ 3-1/4” Main Wheels (2) (Dubro 325T)
❏ 2-3/4” Nose wheel (1) (Dubro 275T)
❏ (2) 3/16” Wheel Collars (Great Planes
GPMQ4308 recommended)
❏ Top Flite Super MonoKote
®
(3-4 rolls, See
Finishing
section)
❏ Paint (see
Finishing
section)
❏ 24” Silicone Fuel Tubing (Great Planes
GPMQ4131 recommended)
❏ 1/2” Latex Foam Rubber Padding (Hobbico
®
HCAQ1050 recommended)
❏ 2-1/4” Spinner
(Top Flite TOPQ5405 recommended)
Optional:
❏ Fuel Filler Valve (Great Planes GPMQ4160
recommended)
❏ (6) Large Hinge Points (for flaps) (Robart
#309 recommended)
❏ Top Flite Header & In-Cowl Muffler (See
page 4 for more information)
❏ Ram #03 Landing Lights (RAMQ2303)
❏ Ram #04 Rotating Beacon (RAMQ2304)
❏ Ram #14 Big Airplane Navigation Lights
(RAMQ2314)
❏ Robart Robostrut Nosegear (ROBQ1707) or
❏ Robart Front Wheel Strut Cover
(ROBQ2703)
We recommend Top Flite Supreme
™
CAs
and Epoxies
❏ (2) 2 oz. CA (Thin) (TOPR1003)
❏ (2) 2 oz. CA+(Medium) (TOPR1008)
❏ 1 oz. CA- (Thick) (TOPR1011)
❏ 6-Minute Epoxy (TOPR1040)
❏ 30-Minute Epoxy (TOPR1043)
❏ Titebond
®
Wood Glue (optional)
❏ Hand or Electric Drill
❏ Drill Bits: 1/16”, 3/32”, 1/8”, 5/32”, 3/16”,
13/64”, 1/4”, 15/64”
❏ Soldering Iron and Silver Solder
❏ Sealing Iron (Top Flite)
❏ Heat Gun (Top Flite)
❏ Hobby Saw (X-ACTO
®
Razor Saw)
❏ Hobby Knife, #11 Blades
❏ Razor Plane (Master Airscrew)
❏ Pliers
❏ Screwdrivers (Phillips and flatblade)
❏ Round file (or similar tool)
❏ T-Pins (short & long)
❏ String
❏ Straightedge with scale
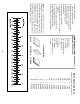
SUGGESTED SUPPLIES AND TOOLS
OTHER ITEMS REQUIRED
DOCUMENTATION
Three-view drawings and photo packs of
N735PE and other Cessna 182’s are available
from:
Scale Model Research,
3114 Yukon Ave, Costa Mesa, CA 92626
(714) 979-8058
NOTES FOR COMPETITION
MINDED MODELERS
The flaps require one extra channel, a
Y-harness, and two standard servos. They are
a highly recommended
fun option
for those who
wish to install them. More information on the
use of the flaps may be found in the “Flying”
section.
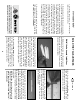
OPERATIONAL LIGHTING
We installed an operational lighting system
for added realism and scale appearance. If you
plan to use a similar system you should route
the wiring before enclosing the wing and fin. In
lieu of installing the actual wires, string can be
taped into position for use in pulling the wires
through the structure after covering. We used
a separate servo connected to the
retract
cir-
cuit of the radio (instead of “Y-ing” into the flap
servo) to operate the landing lights. The rotat-
ing beacon and position lights were connected
to a hidden toggle switch. (See
Optional
Lighting
in the next section)
5