
User manual Cessna 182
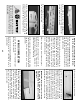

❏❏7. Working quickly, apply a bead of thick
CA to the structure that the skin will touch. Don't
glue hatch rails yet. Apply glue to the Spar last.
Position the skin over the frame, then press it
into place. Important: Before the CA kicks off,
weight down the center panel and the TE of the
wing at W-14 to set the washout angle. Repeat
steps 6 and 7 for the other outer wing panel.
❏❏8. After the CA has cured, turn the wing
over and apply a bead of thick CA to the inside
of the LE / Skin junction and any other areas
that need a little extra glue.
❏❏9. Cut two 14-1/2” pieces from a 1/16” x 3”
x 36” balsa sheet. Save the off-cut piece for use
in a few minutes. Cut the 14-1/2” sheets to the fit
the uncovered area of the flaps. Use a leftover
piece of 1/16” balsa sheeting to make two
triangular pieces to fill in remaining un-sheeted
area.
❏❏10. Turn the wing over and place it on foam
rubber or a soft surface to avoid premature
hangar rash.
NOTE: if you are not installing flaps, don’t
mark or cut the two inboard openings.
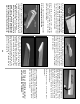
❏❏11. Use a sharpened piece of wire or long
T-pin to bore small holes through the skin from
the inside to mark the location of the flap and
aileron servo hatches.
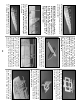
❏❏12. Rough cut the hatch openings on the
inside of your guide holes, then use a 1/16” ply
Hatch Cover to mark and cut the full size
opening.
Remember, it’s faster to enlarge a hole
that’s too small than to shrink one that’s oversize.
After enlarging holes, use thin CA to glue the
skin to the hatch rails.
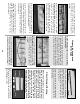
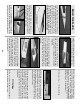
❏❏13. Use a sharpened piece of wire to bore
through the exposed side of the Wing Bolt plate
to mark the holes in the bottom wing skin for the
wing bolts. Mark these holes now, as it will be
difficult to find the location after the top wing skin
is applied. To avoid splitting the balsa, bore the
holes in the skin with a grinding stone and moto-
tool rather than going through with a drill.
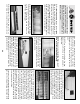
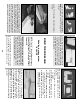
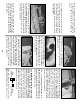
❏❏14. You can simplify the job of “fishing” the
servo wires through the enclosed wing with a
little preparation. Tape one end of a 30” length of
string to the inside of the wing sheeting just past
the aileron servo hatch opening. Thread the
string through the lightening holes in the ribs into
the center section. Bore a 1/2” hole for the servo
leads to exit through the bottom of the wing.
Secure the string next to the hole with another
piece of tape. Repeat this procedure for the
other wing panel. When the time comes to
thread the servo wires, just tie them to the string
from the hatch end and pull them through to the
center compartment exit hole.
If you plan to install navigation lights on the wing
tips, use the string technique described in the
The best balsa filler is no balsa filler! Take
your time fitting all sheeting and skins in place.
With a little bit of careful sanding you will be
rewarded with perfectly matched joints and a
lighter, stronger airframe.
23