
User Manual

38
❏
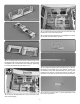
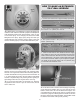
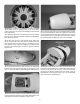
12. Before gluing, use sandpaper to roughen the gluing area
inside the cowl. Clean the area with a paper towel dampened
with denatured alcohol. Mix approximately 1/2oz [14.7cc]
of 30-minute epoxy. For a stronger joint, add some milled
berglass to the epoxy. Apply epoxy along the marks you
made inside the cowl. Insert the dummy engine in the cowl.
Use the remaining epoxy to create a llet around the joint.
❏
13. Cut the end from the plastic bag the cowl came in. Slide
the bag over the front of the fuselage. Cut openings where
the four cowl ring dowels and the three mounting bolts are
located. Reinstall the cowl ring and secure it with three 6-32
x ¾" socket head cap screws, #6 lock washers and #6 at
washers. The plastic bag is to prevent glue from getting on
the fuselage when the cowl is glued to the cowl ring.
❏
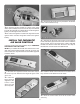
14. For the next few steps you will need a 10" [254mm]
long Ball-end hex wrench. If you do not have one, here is
how to make one.
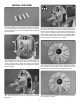
HOW TO MAKE AN EXTENDED
7/64” BALL WRENCH
1. Cut the 7/64" ball wrench in approximately equal parts.
2. Use a piece of sandpaper to remove the coating from
the wrench 1-1/2" (38mm) from the cut.
3. Cut a piece of 5/32" x .014 (3.9 x .3mm) round brass
tube 6" (152mm) long.
4. Clean the ball wrench with denatured alcohol. Apply
silver solder ux to the cut ends of the ball wrench and the
inside of the brass tube. Slide the cut ends of the wrench
into the brass tube 1" (25.4mm). Heat the tube and the ball
wrench and use silver solder to join the pieces together.
The length of the wrench needs to be 10" (254mm) long
to reach the bolts inside the cowl.
❏
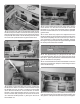
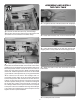
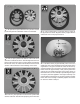
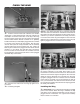
15. Test t the cowl on the front of the fuselage. Depending
on the engine and muf er used, you may need to trim the
bottom of the cowl to t over the head of the engine. The
cowl will t tight over the plywood cowl ring. Center the hole
in the dummy engine on the engine drive washer or RimFire
65 motor. Temporarily install a propeller. The propeller needs
to clear the front of the cowl by 3/32" [2.5mm].